
Abstract
Intact, enveloped coronavirus particles vary widely in size and contour, and are thus refractory to study by traditional structural means such as X-ray crystallography. Electron microscopy (EM) overcomes some problems associated with particle variability and has been an important tool for investigating coronavirus ultrastructure. However, EM sample preparation requires that the specimen be dried onto a carbon support film before imaging, collapsing internal particle structure in the case of coronaviruses. Moreover, conventional EM achieves image contrast by immersing the specimen briefly in heavy-metal-containing stain, which reveals some features while obscuring others. Electron cryomicroscopy (cryo-EM) instead employs a porous support film, to which the specimen is adsorbed and flash-frozen. Specimens preserved in vitreous ice over holes in the support film can then be imaged without additional staining. Cryo-EM, coupled with single-particle image analysis techniques, makes it possible to examine the size, structure and arrangement of coronavirus structural components in fully hydrated, native virions. Two virus purification procedures are described.
You have full access to this open access chapter, Download protocol PDF
1 Introduction
The success of electron cryomicroscopy (cryo-EM) is highly dependent on the quality of the prepared sample. Experience has shown that in order to be useful cryo-EM virion preparations should contain approximately 1010 infectious particles per milliliter in a relatively pure suspension. This requires at minimum a 100-fold concentration step, since coronavirus growth seldom surpasses 108 PFU/ml. Moreover, the coronavirus envelope and the protein-mediated connections between the membrane and the ribonucleoprotein are sensitive to mechanical and osmotic disruption. The viral spike proteins (S) are sensitive to ectodomain shearing and, if cleaved, to shedding of the amino-terminal S1 subunit. The method of concentration and purification described here is designed to minimize these disruptive forces and has been used successfully with several coronaviruses and other enveloped viruses.
Sample adsorption is sensitive to viscosity, and both the alternative serum-free purification protocol and the sample loading protocol provide potential solutions for high-viscosity preparations. These protocols are designed to assist the investigator in preparing virus samples for cryo-EM. From this point, microscopy and image analysis techniques will vary with the type of instrument and the nature of the investigation. It is hoped that these techniques will facilitate further examination of coronavirus, torovirus, arterivirus, and ronivirus supramolecular architecture.
2 Materials
2.1 Virus Purification and Concentration
-
1.
Dulbecco’s Modified Eagle’s Medium supplemented with 10% fetal bovine serum, antibiotics, 10 mM HEPES buffer, pH 7.
-
2.
Precipitation reagents: polyethylene glycol-8000, white flake type (PEG-8000 Ultra for Molecular Biology, available from Fluka) and NaCl, crystalline, high quality.
-
3.
HEPES-saline: 9 g NaCl (0.9% final), 10 ml of 1 M HEPES, 990 ml purified water, pH adjusted to 7.0, vacuum-sterilized through a 0.2-μm pore size membrane.
-
4.
3X HEPES-saline: 27 g NaCl, 30 ml of 1 M HEPES, 930 ml purified water, pH adjusted to 7.0.
-
5.
50% (w/w) sucrose: 50 g sucrose, 50 g HEPES-saline, vacuum-sterilized through a 0.2-μm pore size membrane. Dilute with HEPES-saline to prepare 10, 20, and 30% sucrose solutions.
-
6.
25% neutral buffered formalin: 10 ml of formalin (37–40% formaldehyde), 5 ml of 3X concentrated HEPES-saline.
-
7.
Centrifuges and rotors: A low-speed centrifuge and rotor with a capacity of ≥1 liter (Sorvall GSA, e.g.), and a high-speed centrifuge and rotor with a total capacity ≥100 ml (Beckman SW28, e.g.).
2.2 Serum-Free Virus Purification and Concentration
-
1.
Virus production serum-free medium (VP-SFM; Gibco/Invitrogen) supplemented with antibiotics and glutamine.
-
2.
All other reagents and equipment as in Section 2.1.
2.3 Quality Control EM
-
1.
Formvar/carbon coated 200-mesh or 300-mesh EM grids (available from Ted Pella).
-
2.
Plasma glow discharge unit (available from Emitech).
-
3.
Negative stain: 2 g uranyl acetate (available from Electron Microscopy Sciences), 100 ml purified water, filtered through a 0.2-μm membrane, stored in a brown glass bottle away from light.
-
4.
HEPES-buffered saline (Section 2.1, step 5).
-
5.
Parafilm M (American Can Company).
-
6.
Fine forceps for EM grid manipulation (available from Ted Pella).
-
7.
Filter paper (Whatman 3 M).
2.4 Sample Loading and Grid Freezing
-
1.
Holey carbon grids (Quantifoil holey film with circular holes; Quantifoil Micro Tools) (Fig. 1).
Fig. 1. 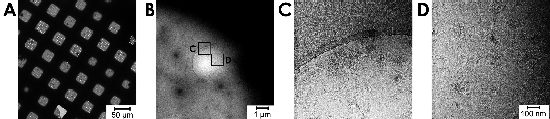
Cryo-EM of feline coronavirus (FCoV). Arrays of holes containing vitrified FCoV particles can be seen at left (A), along with a close-up image of a single hole (B). The viral envelope, spikes, and internal components are visible at higher magnification (C) and (D). Automated image collection was performed using Leginon.
-
2.
Cryogenic reagents: Liquid nitrogen and an ethane gas cylinder fitted with a flow regulator and a fine nozzle.
-
3.
Ethane plunge device: large liquid nitrogen reservoir, smaller ethane liquefaction chamber made from a thermally conductive material, and a drop-release specimen holder (available as a set from Electron Microscopy Sciences).

3 Methods
As the quality of the virus preparation is the most important component of the cryo-EM technique, two purification protocols are listed below. Either can yield cryo-EM-quality coronavirus, but the method in Section 3.1 is generally preferred because the serum proteins function as a “carrier” during the PEG precipitation step. Serum-free purification (Section 3.2) can be used when virus preparations tend to produce overly viscous purified virion solutions. For best results, the purification process should be completed in 1 day, and the virus loaded onto holey grids no later than 24 h after purification.
3.1 Virus Purification and Concentration
-
1.
This method is suitable for most coronaviruses that grow well in cultured cells and has been used successfully with SARS-CoV, FcoV, and MHV ( 1 ) in addition to several types of arenavirus (B. N., unpublished data). For the purpose of this protocol, it is assumed that SARS-CoV is being prepared on Vero-E6 cells.
-
2.
Culture Vero-E6 cells in DMEM to approximately 70–90% confluency (see Note 1).
-
3.
Inoculate with SARS-CoV at a multiplicity of approximately 3 PFU/cell.
-
4.
Remove the inoculum after 1 h and replace it with fresh medium.
-
5.
Remove and discard the culture medium 24 h after inoculation. Replace it with fresh DMEM (see Note 2).
-
6.
Collect the cell culture supernatant 48 h after inoculation. Store a small sample for plaque assay titration (see Note 3).
-
7.
Transfer the supernatant to centrifuge bottles with screw caps, noting the total volume. Pellet cellular debris at 10,000 ×g, 4°C for 20 min. It is best to use a high-capacity rotor at this stage to minimize preparation time.
-
8.
During the centrifugation, prepare fresh screw-cap centrifuge bottles containing 10 g of dry PEG-8000 and 2.2 g of NaCl per 100 ml of culture medium to be added. Alternatively, prepare a large conical flask with sufficient PEG-8000 and NaCl to bring the entire volume of virus-containing medium to a final concentration of 10% PEG-8000, 2.2% NaCl. Chill HEPES-saline and neutral-buffered formalin on ice for later use (see Note 4).
-
9.
After centrifugation (step 6), an off-white or yellow pellet of cell debris will be visible. Decant the supernatant into the centrifuge bottles or conical flask prepared earlier with PEG and NaCl.
-
10.
Swirl the mixture gently until the additives are fully dissolved. Add a clean stir bar and incubate at 4°C for a further 30 min with gentle stirring.
-
11.
Transfer the solution to centrifuge bottles, if you have not done so already Collect the PEG-precipitated protein fraction by centrifugation for 30 min at approximately 10,000 ×g.
-
12.
During the centrifugation, prepare three-step 10% - 20% - 30% sucrose gradients in tubes appropriate to the high-speed centrifuge rotor. If using the Beckman SW-28 rotor, use ∼8 ml for each step, leaving ∼10 ml for sample loading and balancing (see Note 5).
-
13.
Decant and discard supernatants immediately to minimize sample loss. A large opaque white pellet should be present in each of the flasks following centrifugation. Swirl the pellet in cold HEPES-saline until dissolved. Avoid using a pipette at this step, if possible. It is critical that the PEG pellets be completely resuspended before proceeding to the next step (see Note 6).
-
14.
Overlay the PEG-protein solution carefully onto the sucrose gradients. Balance with remaining sample or additional HEPES-saline. Pellet the virions through the sucrose cushions by centrifugation at 100,000 ×g for 90 min at 4°C.
-
15.
Decant and discard supernatants immediately. Invert the empty tubes on an absorbent surface for 5 min and tap gently to wick away any remaining sucrose solution. Resuspend the virion pellet in as small a volume of HEPES-saline as possible (typically 100–200 μl). Do not use a pipette to resuspend the virus, as this may shear spikes and damage fragile viral envelopes (see Note 7).
-
16.
When the pellet has been resuspended, the HEPES-saline will turn somewhat milky in color. Use a P-1000 pipette tip with the pointed end removed to gently transfer the virus suspension to a cryovial. Discard any insoluble material. Set aside a small sample for diagnostic purposes.
-
17.
At this stage, the virus should be monodisperse, and can be inactivated if desired. Treatment with a 1% final concentration of ice-cold neutral buffered formalin, 2-propiolactone treatment, or gamma-irradiation should all yield intact, inactivated EM-quality particles. Samples for cryo-EM may be stored at 4°C for up to 24 h (see Note 8).
3.2 Serum-Free Virus Purification and Concentration
-
1.
This alternative method is suitable for purification of viruses that grow to lower titers. Serum-free culture and preparation can also be used to remedy solutions that fail for cryo-EM owing to high viscosity, nonviral protein contamination, or large amounts of insoluble material. Percentage recovery will often be lower than with the protocol described in Section 3.1 (see Note 9).
-
2.
Perform steps 2 to 11 in Section 3.1, substituting VP-SFM for DMEM starting at the time of inoculation.
-
3.
The PEG-protein pellets should be white and may be quite small. Decant and discard the supernatants immediately. Resuspend by swirling gently in 10 ml HEPES-saline (see Note 10).
-
4.
Perform steps 12 to 15 in Section 3.1. The final translucent pellet may be small and quite difficult to see.
3.3 Quality Control
-
1.
The relative infectivity of the final preparation should be directly assessed by plaque assay or similar means as a retrospective measure of quality. However, the decision to freeze grids for cryo-EM must be taken immediately. The quickest way to assess sample quality is by standard transmission EM of a negatively stained sample. Ideal samples for cryo-EM should contain a high density of virions with intact spikes and little nonviral material. This protocol describes how to prepare a negatively stained coronavirus specimen for transmission EM.
-
2.
Plasma glow discharge several formvar/carbon-coated EM grids prior to use to make the support surface more hydrophilic (see Note 11).
-
3.
Trace several lines on a piece of parafilm M with the dull end of a pair of forceps to create channels for droplets of negative stain and wash buffers. On the parafilm, place one ∼20 μl droplet of 2% uranyl acetate and up to three droplets of HEPES-saline along the grid. The number of HEPES-saline washes will depend on the viscosity of the virus sample being imaged (see Note 12).
-
4.
Place 3–5 μl of the viral sample on each grid, and adsorb for 5 min.
-
5.
Float each grid on each droplet of HEPES-saline for 30 sec. Do not reuse buffer or stain droplets to avoid sample contamination.
-
6.
Float each grid on a uranyl acetate droplet for 1 min.
-
7.
Touch the edge of the grid to the filter paper several times to remove excess stain (see Note 13).
-
8.
Samples should be visualized immediately, but can be stored for longer periods under a vacuum.
3.4 Sample Loading and Grid Freezing
-
1.
This procedure describes a protocol for vitrifying coronavirus specimens.
-
2.
Plasma glow discharge holey carbon grids before use.
-
3.
Fill the outer coolant reservoir of the vitrification apparatus with liquid nitrogen. This will be used to cool ethane to liquid form, and ultimately a semisolid “slush” that will be used to cryopreserve the virus sample.
-
4.
Wait until the temperature of the inner cooling chamber has stabilized, and the liquid nitrogen is no longer boiling. Dispense ethane into the inner cooling chamber. Wear protective clothing and eye protection at this stage, since ethane splatter can be dangerous. Fill the ethane chamber without allowing any liquid nitrogen to splash into the inner chamber. Stir occasionally until the consistency of the liquid ethane changes as it begins to freeze. If the ethane freezes at any point, liquefy it by adding fresh ethane.
-
5.
Center a pair of EM forceps in the plunge device over the inner ethane chamber. Check that the grid will be plunged well below the level of the ethane slush. Adjust the level of ethane if necessary.
-
6.
Pick up a holey carbon grid by the edge using the forceps and slot the forceps into the plunge device.
-
7.
Adsorb 3–5 μl of sample onto the carbon-coated (dull) side of the grid.
-
8.
Blot the edge of the grid against the filter paper to remove excess volume (see Note 14).
-
9.
Immediately plunge the grid into the ethane slush (see Note 15).
-
10.
Detach the forceps, still holding onto the grid below the surface of the ethane. Avoid touching the walls of the ethane chamber.
-
11.
Quickly transfer the sample from the ethane to the outer liquid nitrogen reservoir.
-
12.
Place the grid into a grid box while still under the liquid nitrogen. Avoid bumping the grid on the walls of the liquid nitrogen reservoir. The grid must be stored and handled under liquid nitrogen from this point forward to remain vitrified.
4 Notes
-
1.
Plan to prepare at least ∼1010 PFU of SARS-CoV. Assuming an average SARS-CoV titer of ∼107 PFU/ml, 1 liter or more of infectious cell culture medium will be needed. One-well plates (available from Nalgene) can be a cost- and space-effective alternative to standard tissue culture flasks for large-scale virus preparation.
-
2.
Early time points containing little virus can be discarded. Purification efficiency is strongly dependent on concentration.
-
3.
Virus can be collected at 2- h intervals beginning 48 h after inoculation to increase the final yield. However, for best results, each virus sample should be processed immediately, rather than collected and stored.
-
4.
For viruses with cleaved spike proteins, such as MHV, the amount of NaCl added should be reduced to 1 g/100 ml to minimize damage to the spikes.
-
5.
Alternatively, virus can be banded at the interface of a 30–50% two-step sucrose gradient.
-
6.
In general, rapid resuspension, cold temperature, and the minimization of mechanical stress will all improve the quality of the preparation. Soluble proteins contained in the pellet may alter the color to a yellowish hue.
-
7.
The translucent virion pellet may be difficult to see. Whether or not the pellet is visible, attempt to resuspend immediately. If a pellet is present, the viscosity of the added HEPES-saline will increase noticeably upon resuspension.
-
8.
Inactivation techniques should be validated beforehand. Both formaldehyde and 2-propiolactone can lose effectiveness over time. Tris buffers will react with formaldehyde, and should be avoided. HEPES buffer is therefore recommended for use throughout the purification process.
-
9.
The growth of SARS-CoV, FcoV, and MHV is not affected by short-term treatment with VP-SFM as outlined here. However, cells do grow more slowly in VP-SFM as compared to DMEM, and thus VP-SFM is not recommended for the initial cell culture step.
-
10.
If left in contact with the supernatant, serum-free PEG pellets will resuspended much more quickly than serum-containing pellets, and the sample may be lost.
-
11.
Grids that continually sink in the saline or stain droplets likely have suffered extensive damage to the support surface and should not be used.
-
12.
The purpose of glow discharge treatment is to impart a charge to the carbon-coated side of the grid, which can otherwise be quite hydrophobic. Therefore, glow discharge grids with the carbon side, which will appear slightly dull, facing upward.
-
13.
The effects of the electron beam on large amounts of residual stain can cause a “blowout” of the carbon/formvar support surface. It is therefore important to remove all excess stain before visualization.
-
14.
The vitrified ice supporting the specimen must be very thin (∼1 μm or less) to permit clear imaging.
-
15.
Sample blotting is unfortunately an inexact process. The thickness of the sample ice can be adjusted by altering blotting time, which typically ranges from 0.5 to about 15 sec. Ice thickness and quality will have to be assessed by EM (Fig. 12.1), so it is recommended that several grids be prepared at once using different blot times.
References
Neuman, B. W., Adair, B. D., Yoshioka C., et al. (2006) Supramolecular architecture of severe acute respiratory syndrome coronavirus revealed by electron cryomicroscopy. J. Virol. 80, 7918–7928.
Stadler, K., Roberts, A., Becker, S., et al. (2005) SARS vaccine protective in mice. Emerg. Infect. Dis. 11, 1312–1314.
Beniac, D. R., Andonov, A., Grudeski, E., and Booth, T. F. (2006) Architecture of the SARS coronavirus prefusion spike. Nat. Struct. Mol. Biol. 13, 751–752.
Suloway, C., Pulokas, J, Fellmann, D., et al. (2005) Automated molecular microscopy: the new Leginon system. J. Struct. Biol. 151, 41–60.
Acknowledgments
Detailed notes left by Dr. Thomas Gallagher were invaluable in refining the purification procedure. Funding for this work was provided by the NIH/NIAID contract “Functional and Structural Proteomics of SARS Coronavirus” HHSN266200400058C and by the Pacific-Southwest Regional Center of Excellence AI-065359. Some of the work presented here was conducted at the National Resource for Automated Molecular Microscopy, which is supported by the National Institutes of Health though the National Center for Research Resources’ P41 program (RR17573).
Author information
Authors and Affiliations
Editor information
Editors and Affiliations
Rights and permissions
Copyright information
© 2008 Humana Press, a part of Springer Science+Business Media, LLC
About this protocol
Cite this protocol
Neuman, B.W., Adair, B.D., Yeager, M., Buchmeier, M.J. (2008). Purification and Electron Cryomicroscopy of Coronavirus Particles. In: Cavanagh, D. (eds) SARS- and Other Coronaviruses. Methods in Molecular Biology, vol 454. Humana Press, Totowa, NJ. https://doi.org/10.1007/978-1-59745-181-9_12
Download citation
DOI: https://doi.org/10.1007/978-1-59745-181-9_12
Published:
Publisher Name: Humana Press, Totowa, NJ
Print ISBN: 978-1-58829-867-6
Online ISBN: 978-1-59745-181-9
eBook Packages: Springer Protocols