the Creative Commons Attribution 4.0 License.
the Creative Commons Attribution 4.0 License.
 | 09 Jul 2019
Soil lacquer peel do-it-yourself: simply capturing beauty
Cathelijne R. Stoof
Jasper H. J. Candel
Laszlo A. G. M. van der Wal
Gert Peek
Visualization can greatly benefit understanding of concepts and processes, which in soil science and geology can be done using real-life snapshots of soils and sediments in lacquer peels and glue peels. While it may seem complicated, anyone can make such a soil peel for use in classrooms, public places, homes, and offices for teaching, outreach, decoration, and awareness. Technological development has considerably simplified the making of soil peels, but this methodological innovation has not been described in the literature. Here, we report on a thoroughly tested and simple method for taking peels of sandy soils using readily available tools and materials. Our method follows the main previously published steps of preparing a soil face, impregnating the soil face with a fixation agent in the field, extracting the resulting peel, and mounting it on a wooden panel. Yet instead of using lacquers and thinning agents, we use strong though flexible contact adhesive (glue), which has the major advantage that it no longer requires use and mixing of toxic chemicals in the field or reinforcement of the peel to prevent breaking. Moreover, the preservation potential is much higher than with the old method. This new twist to old methods makes creation of soil peels safer, simpler, and more successful, and thereby a true DIY (do-it-yourself) activity. The resulting increased accessibility of making soil and sediment peels can benefit research, teaching, and science communication and can thereby bring the value and beauty of the ground below our feet to students, schools, policy makers, and the general public.
- Article
(7786 KB) - Full-text XML
-
Supplement
(48312 KB) - BibTeX
- EndNote


Attention for soils is increasing around the world, in part due to strong initiatives on soil health (Stott and Moebius-Clune, 2017; Schindelbeck et al., 2008) and soil carbon (4 ‰, Minasny et al., 2017), explicit articulation of how soils can help achieve the United Nations Sustainable Development Goals (Keesstra et al., 2016; Bouma and Montanarella, 2016), and the recent United Nations and IUSS declarations of the International Year of Soils (FAO, 2015) and International Decade of Soils (IUSS, 2015), respectively. The relevance of soils lies in the valuable beauty of soils: their multidisciplinary functions and benefits (Brevik et al., 2015; Dominati et al., 2010) and thereby their basis for life, in a world where soils are under threat (Montanarella et al., 2016). Capturing this beauty in monoliths or soil lacquer peels can bring soils to life for education and outreach (Van Baren and Sombroek, 1981; Lawrie and Enman, 2010) or as a form of art (Feller et al., 2015; Breaker, 2013). While it is often thought to be quite challenging to capture soil profiles, a simple twist to an old method now makes the creation of soil peels a surprisingly simple do-it-yourself (DIY) activity for scientists, educators, and the general public.
Soils and sediments can be fixated in two distinct ways: using peels and monoliths. Both methods rely on impregnation of a soil face with a fixation agent (such as lacquer, resin, or glue), and their final product is typically mounted on a wall for study of undisturbed soil layers and characteristics, or simply for decoration. Peels and monoliths are used to record and illustrate a range of different features in soils, such as differences between soil types, soil processes (e.g. weathering, gley, eluviation, and illuviation of clay, iron, and organic acids; Fig. 1a), human impacts (Fig. 1b), as well as biological activity such as plant rooting patterns, burrowing of soil fauna, and bioturbation. Sedimentological and geological processes can also be captured, such as cryoturbation, fluvial and aeolian layering (Fig. 1c), frost wedges (Fig. 1d), and faults (Fig. 1e). And finally, peels can show the splendid colours present in soils and sediments (Fig. 1a–f). These natural snapshots of the subsurface are an effective way to inspire people about soils (Megonigal et al., 2010) and geology, and are used around the world by museums, universities, schools, and institutes (Table 1) for teaching and outreach on the value of soils, the processes occurring in soils, effects of management, and other factors. Interestingly, these soil profiles are also used for testing knowledge of soils in job interviews (Jacqueline Hannam, personal communication, 2018). Peels and monoliths allow comparison of soils inside a classroom or museum environment without the need for students or visitors to travel, allowing exposure to a variety of soils in a short time and increasing accessibility of soil science to those with disabilities that prevent them from observing soil in situ. Consequently, soil science education at Wageningen University, the Netherlands, strongly relies on a collection of ∼150 lacquer peels for teaching purposes – despite the fact that this university is intentionally strategically located in an area where soil variability is high (van der Haar et al., 1993) due to the range of distinct parent materials (glacial, peri-glacial, fluvial, aeolian, organic) and topography, and thus soil types within a 10 km radius of the university.
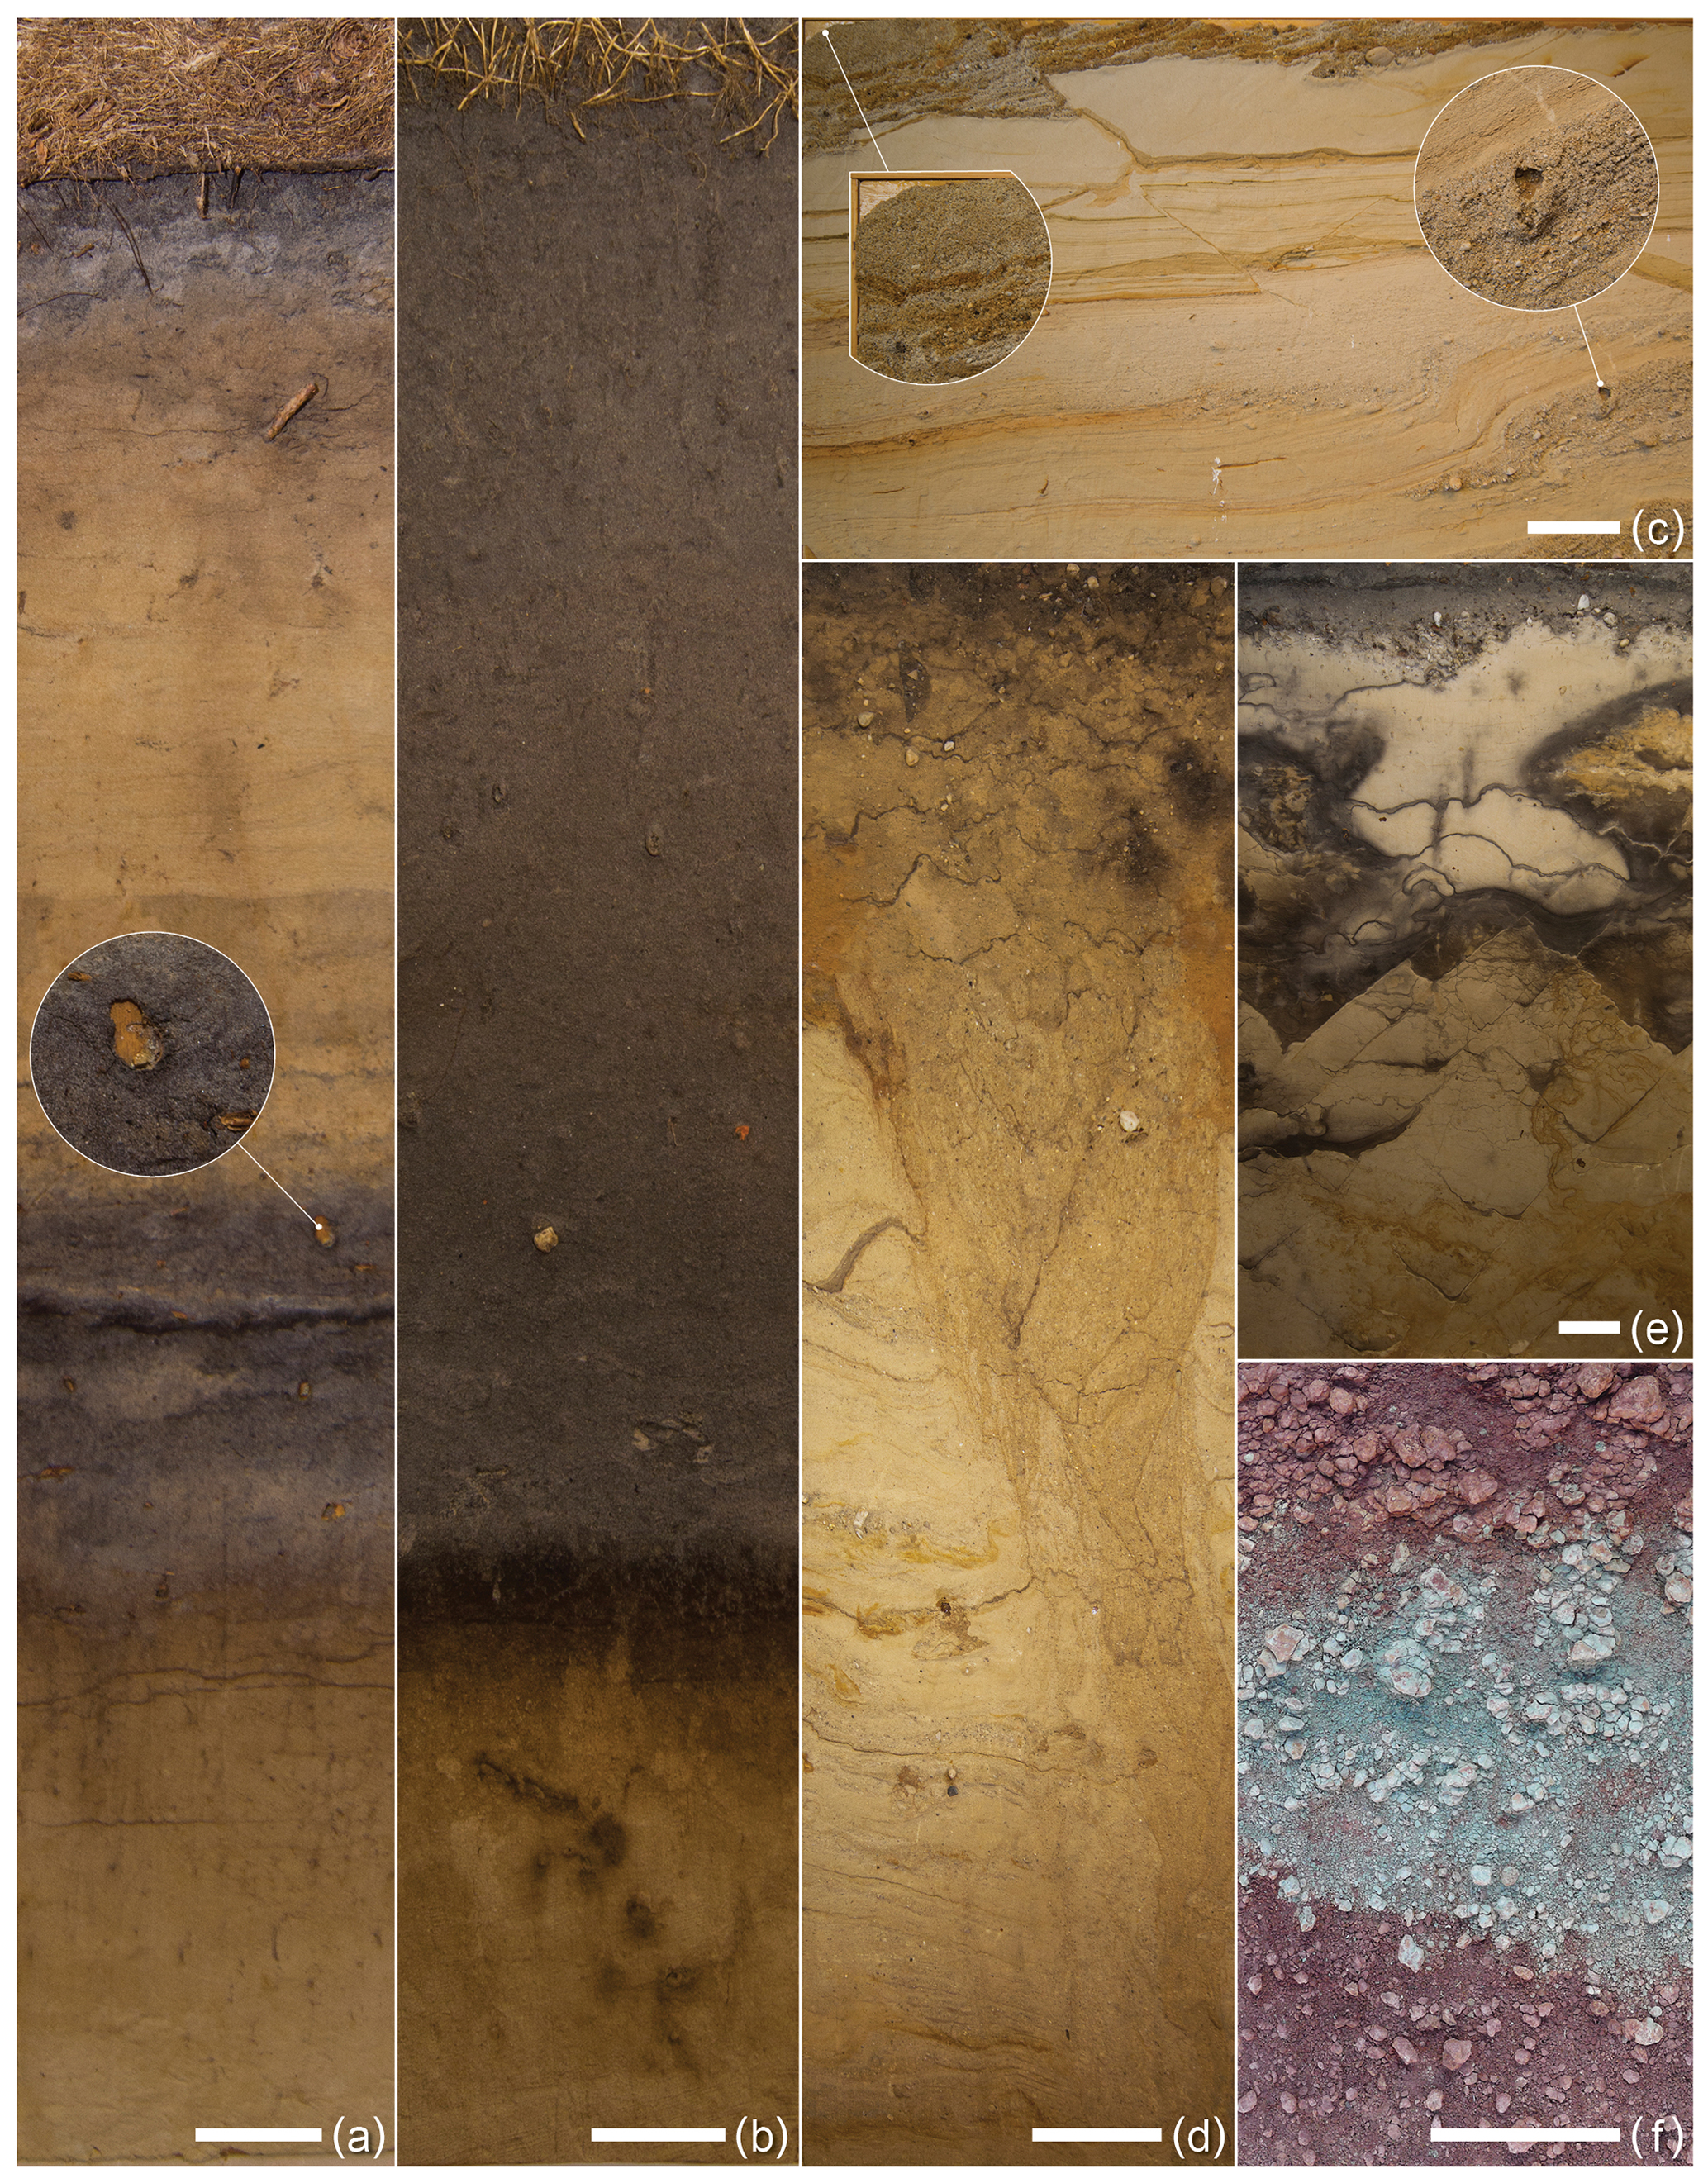
Figure 1Lacquer peels showing (a) paleo podzol (from below inset) covered by drift sands in which a younger podzol is formed, (b) plaggic anthrosol, (c) sedimentary layering, (d) frost wedge, (e) faulting, and (f) colourful sediments. Insets show close-ups of damaged parts of the peel; white horizontal bars represent 10 cm width; panels (a) through (e) are soil and sediment peels made in the Netherlands (Wageningen University collection, the Netherlands); panel (f) is a sediment peel of the Owl Rock member of the Chinle Formation, Chuska Mountains, New Mexico, USA (Diné College collection, Tsaile, Arizona). The white scale bars represent 10 cm.
Table 1Example of 84 museums, universities, schools, and institutes with preserved soil profile collections (soil monoliths and/or lacquer peels) in 40 countries around the world.
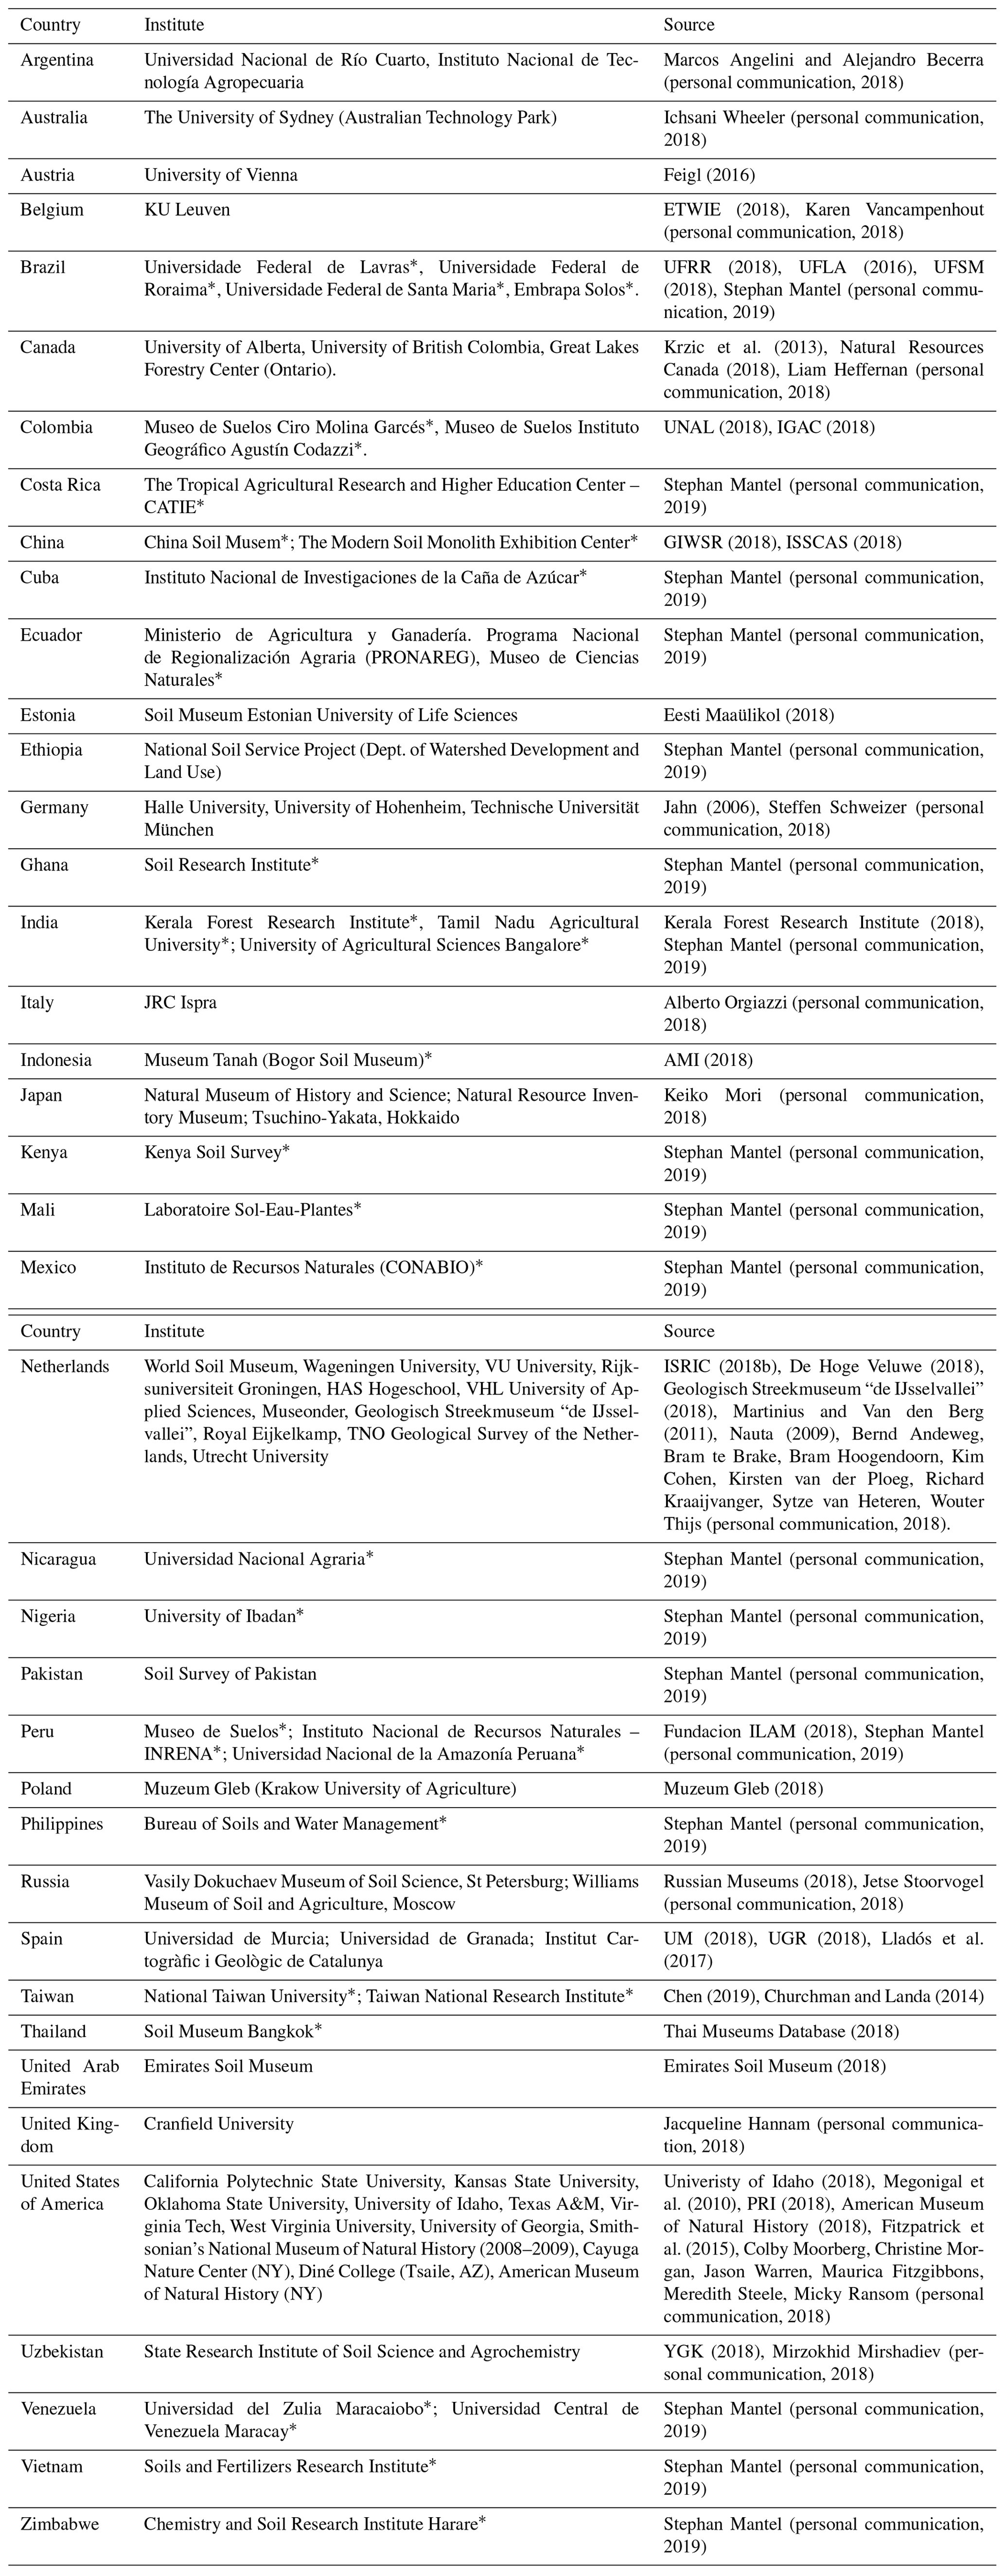
* Institute that partnered with ISRIC-World Soil Information to create a soil monolith collection (Stephan Mantel, personal communication, 2019).
The main difference between making peels and monoliths is the location where the soil is impregnated with a fixing agent: a peel is impregnated in situ and extracted after drying, while a monolith is an undisturbed soil block that is extracted, transported, and then (repeatedly) impregnated in a laboratory (Van Baren and Sombroek, 1981). Monoliths can be created in any soil type, from sands to peats and heavy clays, but is rather time-consuming and requires specialized expertise in both the field and in the laboratory. Their creation and recent methodological developments are rather well described in scientific journals (e.g. Bouma, 1969; Haddad et al., 2009; Allaire and Bochove, 2006; Wessel et al., 2017; Wright, 1971; Donaldson and Beck, 1973; Barahona and Iriarte, 1999; Fitzpatrick et al., 2015), presentations (Fosberg, 2019), and reports (e.g. Van Baren and Bomer, 1979; Kiniry and Neitsch, 2019; Day, 1968; Schuurman, 1955), as well as illustrated in online videos and tutorials (e.g. University of Nebraska – Lincoln, 2016; Mueller, 2018). In contrast to soil monoliths, soil peels cannot be made from clay or peat soils since these are often too wet for impregnation in the field. Peels are therefore limited to relatively coarse sediments that retain less water (lower water holding capacity) and allow more rapid impregnation of fixation agents (because of their higher hydraulic conductivity), which is required in field situations. They thereby provide a rapid and accessible alternative to soil monoliths. The lack-film method for creating peels was first developed in the 1930s (Hähnel, 1962; Voigt, 1936; Jahn, 2006). Yet while the use of soil lacquer peels for scientific purposes has been recognized, e.g. to study sedimentological structures (Bijkerk et al., 2014; Van den Berg et al., 2007), for palaeo-geochemical analysis (Arnoldussen and van Os, 2015), or archaeological applications (Voigt and Gittins, 1977), the guidance available in the scientific literature is scattered, (out)dated, and/or incomplete. An English book that stands out is the comprehensive work by Bouma (1969) that details the history of soil and sediment peels as well as a range of fixation agents used to make these peels. Other published work includes a range of Dutch- and German-language papers, popular-scientific articles and reports (Vos et al., 2016; Huisman, 1980; TNO, 2010; Van Veen, 1985; Hähnel, 1961; Voigt, 1936), as well as a few older English-language articles (Voigt and Gittins, 1977; Van Baren and Bomer, 1979; Brown, 1963; Hähnel, 1962). These publications describe a range of materials used to make peels, most notably (nitrocellulose) lacquers, but also glue and resin.
The main steps of the published methods for making peels are straightforward: a soil face was prepared under an angle and then (repeatedly) impregnated with a fixation agent, with the peel extracted after drying and then mounted on a wooden board. The challenge of the published methods lies in the fixation agents used 50 years ago that required use of toxic solvents (e.g. acetone, toluene, xylene, thinner; Bouma, 1969) in the field to achieve the right viscosity, increasing the risk of harming people and the environment. The resulting peel was rather fragile, and hence reinforcement with cheesecloth or bandage was required to prevent rupture of the dried lacquer peel (Bouma, 1969). This fragility results in a lower preservation potential, which we have noted was especially challenging when the soil peels were frequently handled when used for teaching.
Here we describe and illustrate a simpler, safer, more durable, and thereby more accessible approach to making soil lacquer peels, which relies on the use of glue available at hardware stores. While still synthetic, this glue is less harmful than the previous fixation agents, and its use straight out of the can reduces the spilling risk associated with the mixing of chemicals in the field. Finally, this method can be easily deployed by those who have received no training. This new twist to an old method was developed by Gert Peek, a soil science educator at Wageningen University who started teaching at what was then the Laboratory for Soil Science and Geology at the Landbouwhogeschool Wageningen. As such, this method was used to collect both teaching material and data for MSc theses (e.g. van der Beek and Ellenkamp, 2003) and to enthuse hundreds of students to get a podzol above their bed, through the organization of “soil profile weekends”. As we believe it is essential that scientific methods are preserved for future generations, we now report on the simple steps to capture the beauty of sandy soils for use in universities, schools, government buildings, museums, or simply at home.
2.1 Collect the required materials
2.1.1 Materials needed
A range of materials is required to make a soil peel that can typically be found in any hardware store. Table 2 lists all materials required to prepare the soil face (a spade, pruning scissors or garden shears, nail clippers, soil knife, ruler), to secure the soil (glue), to extract the peel (wooden board, spade, soil knife, pruning scissors or garden shears, garbage bag), to finish the lacquer peel (glue, notched trowel, Stanley knife, nail clippers, scissors), and to mount it (hooks). In terms of personal gear, garden gloves and clothes that can get dirty are sufficient. Any size can be chosen for the final size of the soil peel, and thus the size of the wooden board. Soil profiles at Wageningen University are typically 30×120 cm. A wooden panel >12 mm thick (to prevent warping) is used for mounting – we use multiplex or medium density fibre board (MDF), though any wood can be chosen, depending on the desired aesthetics.

2.1.2 Characteristics of the glue
The fixation agent used to impregnate the soil face is a liquid contact adhesive based on neoprene rubber. Originally designed for shoe repairs that require two sides to be pressed together, this neoprene rubber contact adhesive works very well for making peels because it is flexible yet strong when dry. This flexibility is key for successful extraction of the peel from the soil face: glue that fully hardens when dry (like wood glue or glues used to impregnate monoliths in the lab) will break upon extraction and/or mounting of the peel. Another benefit of this glue is that it does not shrink when drying, unlike the lacquer used for instance by Hähnel (1962). In the Netherlands, neoprene rubber contact adhesive is sold as BisonKit Universal (Bolton Adhesives, Rotterdam, the Netherlands; Bison International, 2018b), which is internationally sold by the same manufacturer under the brand names Uhu Kontakt Kleber and Griffon Contact. The yellowish brown colour of this glue does not affect the colour of the final peel. Neoprene rubber contact adhesive is also known as polychloroprene glue, contact cement, or contact adhesive, and is elsewhere sold by manufacturers such as 3M, DAP Weldwood, Pliobond, and K-Flex-USA – check the suitability of these products in the field before purchasing large volumes. Because some of these brands still contain toluene, it is also advisable to request (material) safety data sheets (known as (M)SDS in the USA) to check for any required personal protective equipment.
The volume of glue (VG, L) required to make a peel, including excess edges and mounting the peel, is calculated as Eqs. (1) and (2):
where bW (m) and bL (m) are the width and length of the wooden board and thus the final size of the peel, respectively, and VM (L) is the volume of glue needed to mount the peel to the wooden board. For a final peel size of 30×120 cm, 3 L is sufficient. At a cost of 5–20 EUR L−1, the total costs of a typical profile amount to under EUR 75. As many stores allow return of unopened cans of glue, we typically purchase more glue than we need and return the excess.
2.2 General preparation
2.2.1 Find a good location
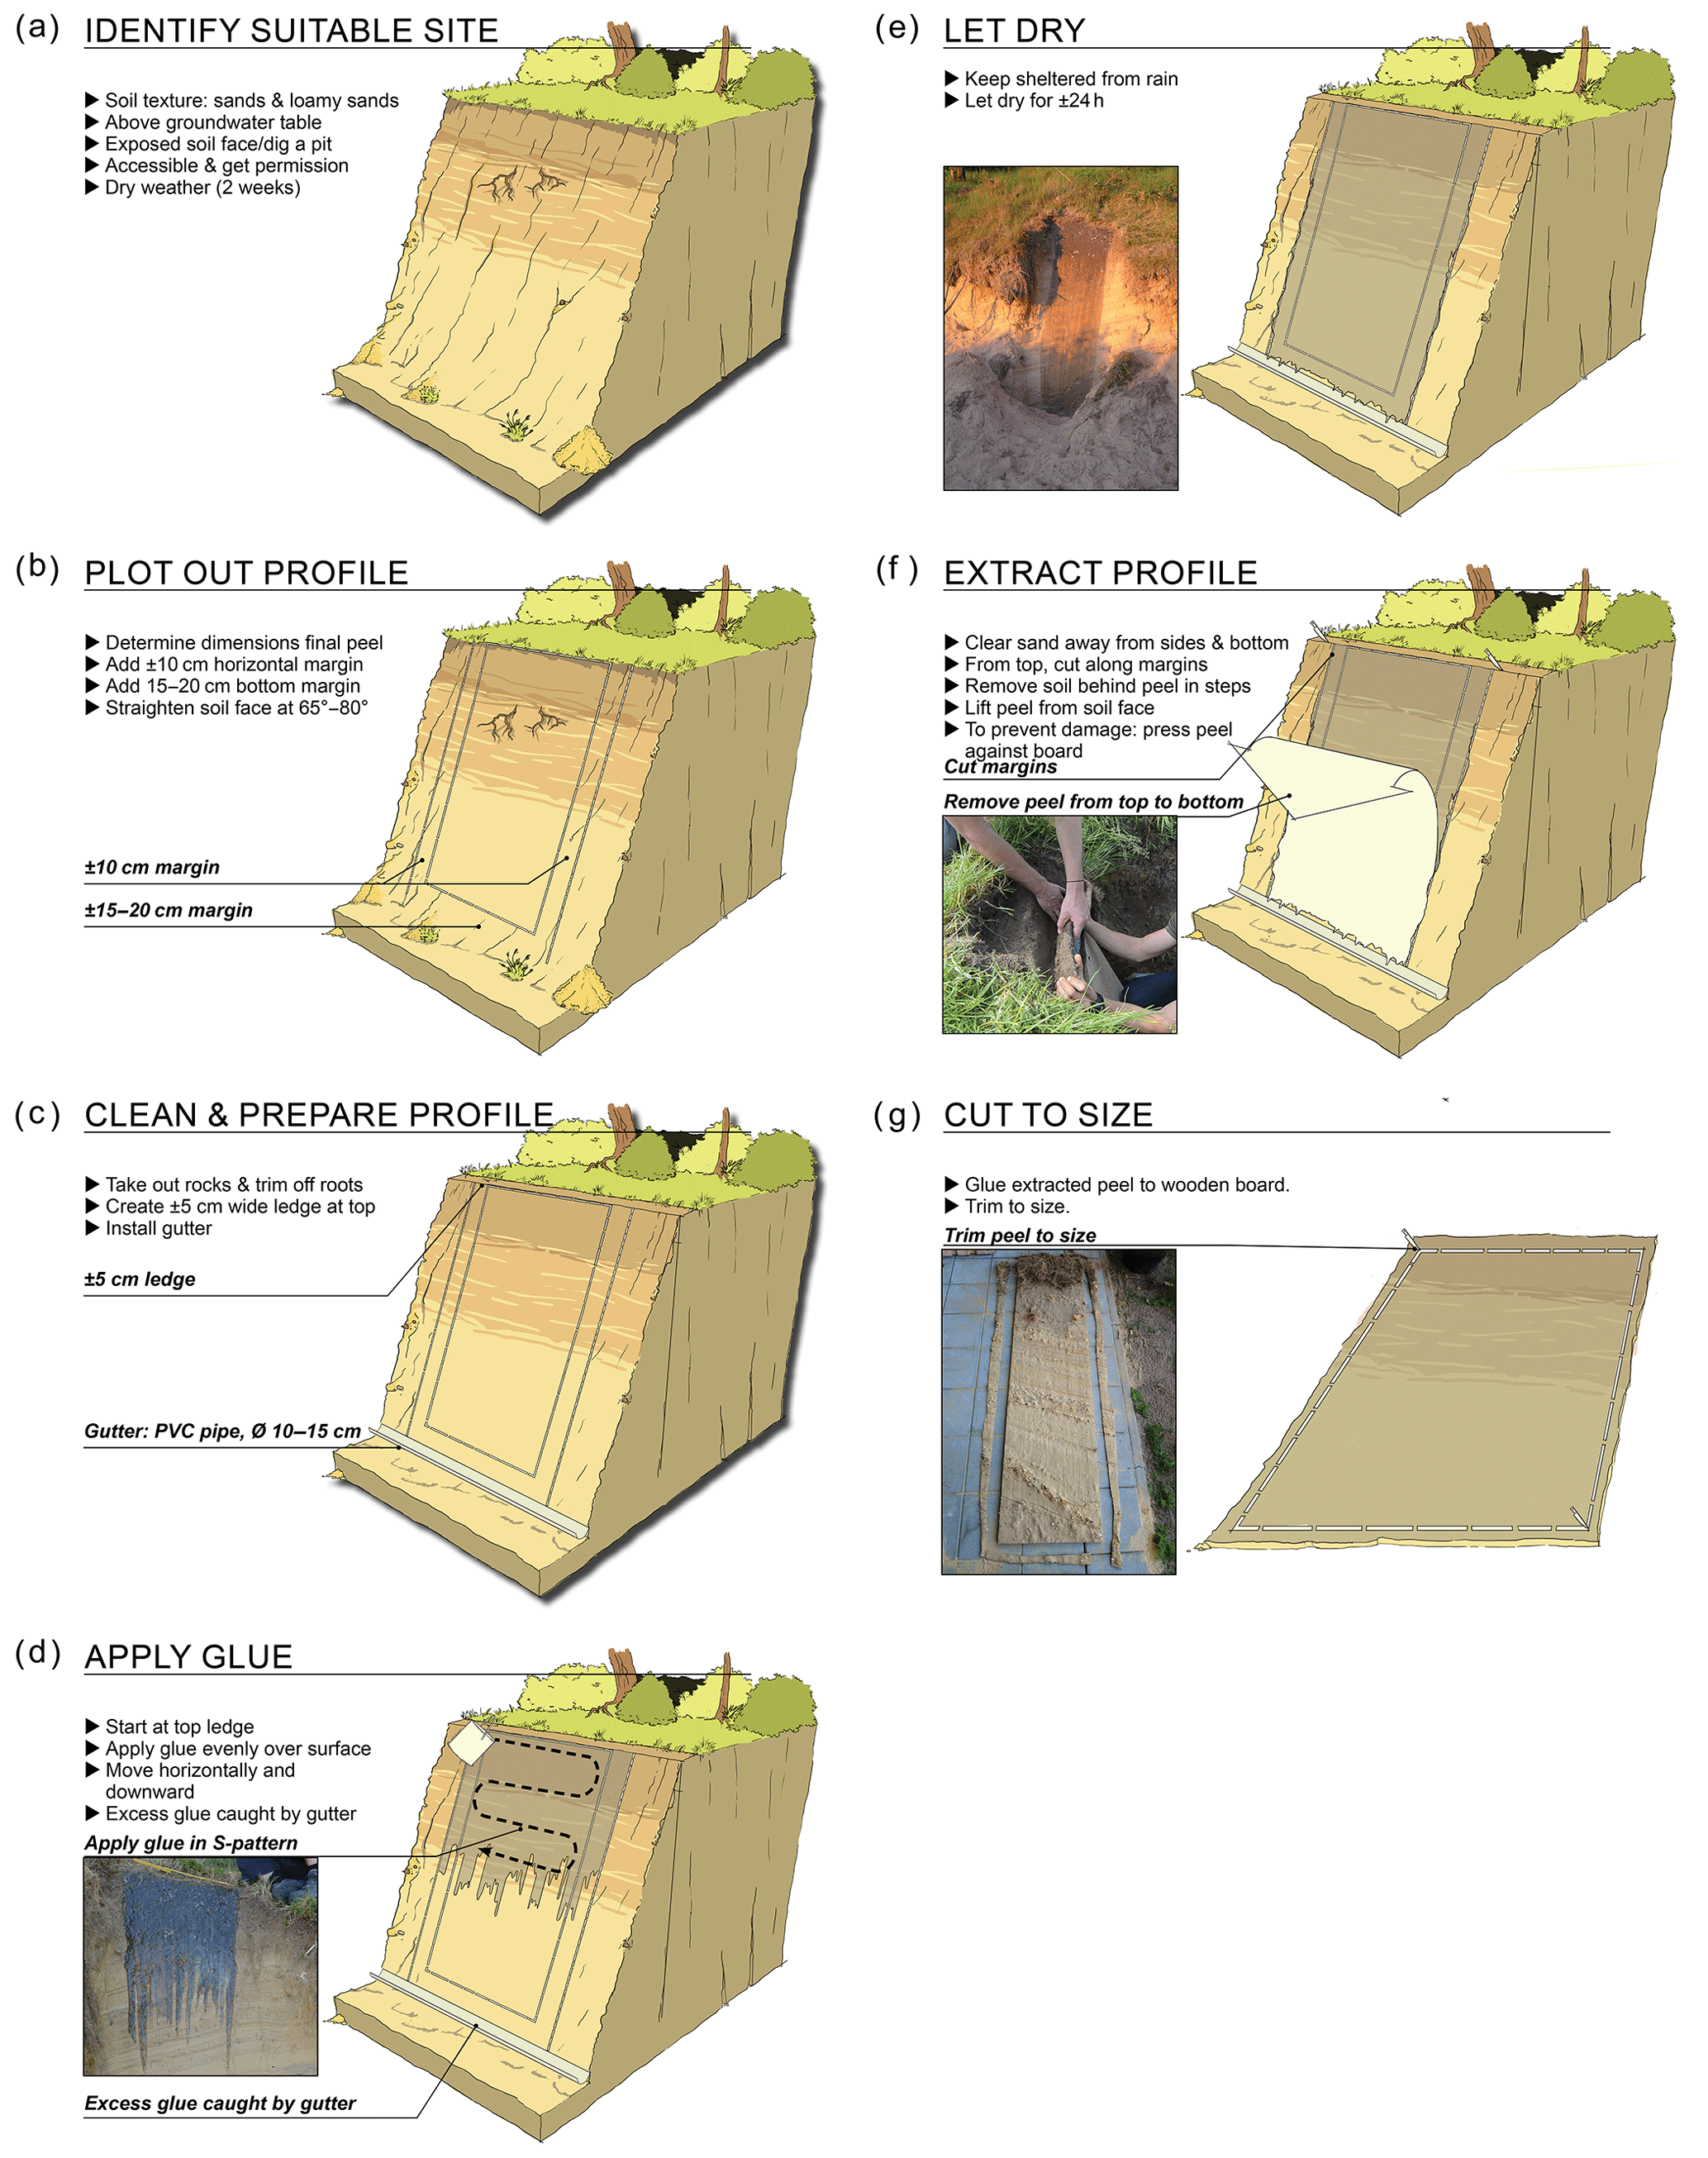
Finding a good location can just be a matter of being outside a lot, knowing the surroundings, and scraping off the outer few centimetres of an exposed road cut to reveal the original soil underneath. In the old days (up to the 1990s) when workload at universities was still low, frequent and lengthy soil mapping field courses allowed for many opportunities to find beautiful soils and capture them in peels. Alternatively, with less time spent outside, good locations can also be found using digital maps that are often available online. Whether outside or behind a computer, four main factors determine the suitability of a location for making a soil peel: (1) soil texture, (2) groundwater depth, (3) a natural or man-made exposure, and (4) accessibility (Fig. 2a).
First, regarding soil texture, lacquer peels are best made in unconsolidated sandy deposits (such as commonly found in delta areas) with low clay, silt, and organic content and ideally low rock fragment or gravel content. Clay and silt have low permeability (Rawls et al., 1982), and so does organic matter when compacted (Ohu et al., 1985), and thereby result in very shallow impregnation of the glue, causing potentially fragile layers. Based on years of field experience in making soil peels we found that the textural classes “sand” and “loamy sand” (Soil Science Division Staff, 2017) are best suitable. This indicates that the clay + silt content should not exceed 30 %, with a maximum of 15 % clay. The minimum sand content should therefore be 70 %. At the same time, the organic matter content should not exceed ∼8 % (humic conditions, sensu De Bakker and Schelling, 1966). Rock fragments and gravel are challenging to work with because they affect the smooth preparation of the soil face (Sect. 2.3) and additionally may fall off the final peel (Sect. 2.6), although results can still be quite successful. To find locations with suitable soil texture and organic matter content, the S-World model (Stoorvogel et al., 2017) and the SoilGrids tool (ISRIC, 2018a; Batjes, 2012) are both valuable and free resources. This can be verified with local soil maps and/or assessment of texture (NRCS, 2019; Thien, 1979) and organic matter content (Schulze et al., 1993; Wills et al., 2007) in the field.
Second, groundwater depth is important because results are best if soils are dry, since the glue used does not adhere properly when soils are wet. Groundwater level variation can be part of hydrological monitoring setups, but can also be recorded on soil maps as the average highest and lowest groundwater levels (e.g. BIS Nederland, 2018). Given that warm and dry weather in late spring or summer is often most beneficial for making soil peels, the most relevant groundwater information there is the average lowest groundwater level (which occurs in summer). The global map of groundwater table depths created by Fan et al. (2013), albeit coarse, can give a first indication of whether a region may be suitable for making soil peels. Alternatively, high (seasonal/perched) groundwater depths can moreover be inferred from soil type (e.g. Fluvisols, Luvisols) and geomorphology (e.g. lower river terraces, floodplains, wetlands, glacial till landscapes prone to hardpan formation), the information of which can be found on soil maps and geomorphological maps. Subsequent combination of soil texture, organic matter, and groundwater information can then provide insight into where peels can be made (e.g. Fig. 3). Combined with information about capillary rise (∼2.5 cm in gravel to >1 m in silt; Singhal and Gupta, 1999), locations of suitable dryness can be found, which is in soils and sediments above the capillary fringe.
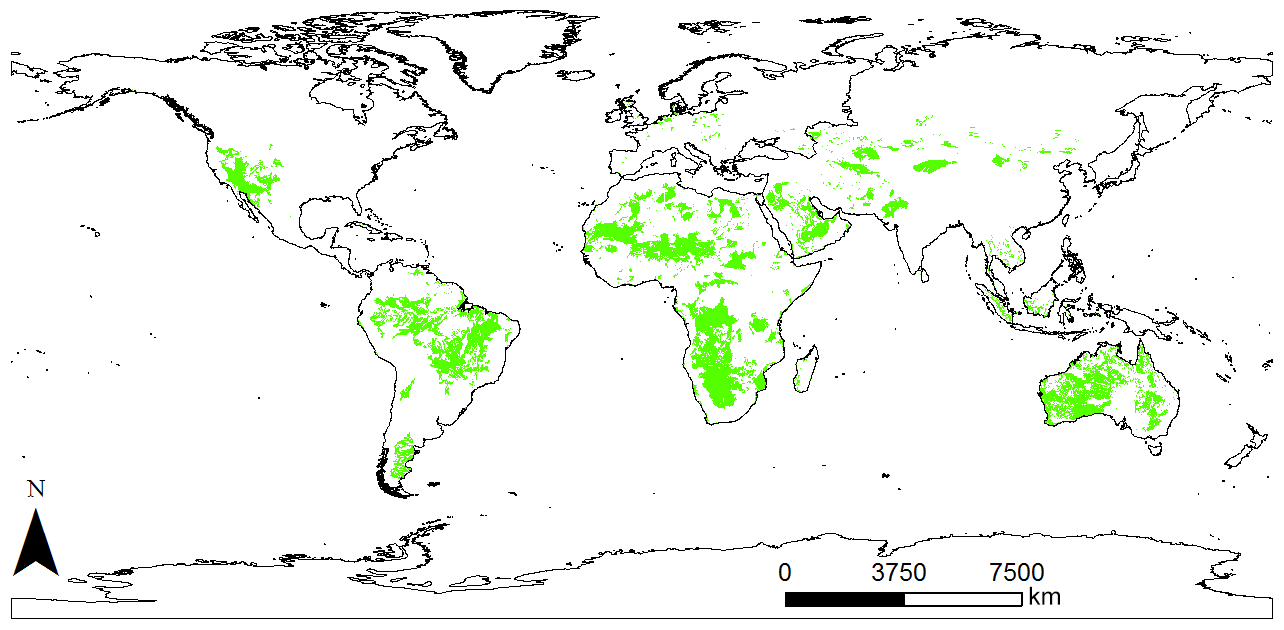
Figure 3Overview of locations suitable for making soil peels in the world (sand content >70 %, clay content <15 %, organic matter <8 %, and temporal mean groundwater depth <1.5 m). This global map was made using soil information obtained from ISRIC (Batjes, 2012; ISRIC, 2018a) and groundwater depth information provided by Fan et al. (2013).
Third, an exposure is essential when making lacquer peels of vertical cross sections of soil or sediment. This exposure can be created by digging a soil pit, which can be done by hand. Approximately 1 m2 is needed to have sufficient work space, with a 1.0–1.5 m depth of the pit to obtain a 0.8–1.3 m long peel. However, as digging a pit can be time-consuming, the most ideal places to make peels are natural drops in elevation such as eroded river banks, or man-made cases such as road cuts, quarries, construction works (river restoration, cable installation), or archaeological digs. Contact local authorities or companies to ask for temporary opportunities, or consult elevation maps for more permanent locations. Elevation maps are often available online. Detailed digital elevation models (DEMs) may also be used; for example, the AHN (Actueel Hoogtebestand Nederland) in the Netherlands is a freely available elevation map with a resolution of 0.5 by 0.5 m (Van Heerd and Van't Zand, 1999). International examples include the EU-DEM with a resolution of 25 by 25 m (EEA, 2018). Exposures such as quarries may additionally be found from aerial photography (e.g. Google Earth).
2.2.2 Arrange permission
Locate the landowner and ask their permission. As many non-soil scientists do not know what a lacquer peel is, a simple explanation free of scientific jargon is to refer to it as a “soil painting” or “soil art”. Be honest about the use of glue, but also explain that you will clean everything up. Check whether the landowner would like to receive notice about the exact moment the fieldwork is planned – though as the process of making a soil peel is weather-dependent, this can often not be indicated much in advance, and acknowledge them in activities resulting from work on their land. Making soil peels can be an opportunity to involve land owners as an outreach activity, by having them on site, or sharing information (photo/video) about the process. In the dry summer of 2018, we created three soil peels on Wageningen University farmland with the pit excavated by Unifarm (farm services) – in return we made a fourth soil peel for Unifarm outreach activities.
2.2.3 Get the timing right
In some climates, planning ahead for making lacquer peels can be challenging as this activity is rather weather dependent. Results are best when soils are dry, creating more intense colours and higher contrast of colours in the peel. In the Netherlands, our experience with the “soil profile weekends” taught that 2 weeks of dry weather in late spring or summer are sufficient to achieve good results. We have never had issues with soils that were too dry, and with the materials we use there is no need to spray the soil with water as suggested by Bouma (1969). While it is possible to make a peel when the soil is moist, the result is not as beautiful because of reduced appearance of for instance podzol fibres, or simply because the glue will not adhere to the sand. Note that while soil moisture contents may strongly vary in time, there may also be considerable differences within a soil profile. When sand may be already dry, horizons with more organic matter or clay can still be quite moist because of their strong effect on soil water retention (Rawls et al., 2003; Wösten et al., 1999). These within-profile differences may be exacerbated by impermeable layers: we once encountered major issues when extracting a peel from a podzol that had a perched water table due to an impermeable Bh horizon. While application of the glue (Sect. 2.4) was successful, the extracted peel showed that the glue had not adhered to the saturated E horizon above the Bh, while the C horizon below the impermeable layer was dry and adhered just fine. This peel was later restored in the lab (Sect. 2.6) using dried sand collected from the E horizon.
Dry weather is recommended both in the couple of weeks before making a peel as well as during the 2 days in the field (Sect. 2.3–2.6), when air temperature is also important. Follow the manufacturer's recommendations regarding the temperature at which the glue can be used (e.g. 15–25 ∘C, Bison International, 2018a). Particularly the first hours after impregnation are critical because any rain occurring soon after impregnation (within 6–10 h) may create bubbles in the glue, resulting in poor impregnation and therefore “bald” spots with reduced sand cover upon extraction. High relative humidity can potentially have similar effects (e.g. >65 %, Bison International, 2018a), although we have never had such issues in the field.
2.3 Field preparation: prepare soil face and cut all roots
2.3.1 Prepare soil face
Use a spade to make a straight soil face at a 65∘ (loamy sand) to 80∘ (sand) angle (Fig. 2b). The dimensions of the soil face to be impregnated should be somewhat larger than the intended size of the lacquer peel. Make the soil face 10 cm wider than the final peel on either side (Fig. 2b), because it is never fully predictable how the glue will flow and thus what the final surface is that will be covered. Also, extend it 15–20 cm below the bottom end of the intended peel to allow unimpeded flow. An additional benefit of making the soil face larger than the final size of the peel is that it allows selection of the best or most beautiful part of the profile for mounting. After all, the final appearance of the front of the lacquer peel remains hidden until after excavation, as the lacquer peel is a mirror image of the soil face. It is therefore always a surprise what the final peel will look like, which is why having additional space to choose the most beautiful part for installation on the board is useful. The prepared soil face should be as smooth and straight as possible – any bumps and hollows can hamper smooth distribution of the glue in the next step. Perfection is not possible though, especially when sediments are brittle or gravelly. It would not be the first time that removing “one last thing” can cause collapse of part of the soil face and thereby necessitate much larger restoration work before the glue can be applied.
2.3.2 Trim roots and remove rock fragments
Cut away all roots protruding from the soil face using garden or nail clippers (for large and small roots, respectively) and remove any rocks or large rock fragments (Fig. 2c). Roots or rocks that stick out will retain glue and can thereby create glue-less pockets that will appear as holes in the finished lacquer peel. Cut the roots as close to the soil face as possible while avoiding any dislocation of sand grains. This can be a rather tedious process as the number of roots can be surprisingly high. Yet careful removal of roots and rock fragments will allow smoother impregnation of the soil face (Step 3), easier mounting of the peel on the wooden board (Step 5), and thus better final results.
2.3.3 Make ledge
Create a 5 cm ledge above the soil face (Fig. 2c), providing a place to pour the glue and preventing any soil material from above from falling onto the profile. If the top of the soil face is the same as the mineral soil surface, this ledge can be created by removing any litter and vegetation. If the top of the soil face starts mid-way a slope, this ledge can be made by simply cutting 5 cm into the soil.
2.3.4 Install gutter
Position a gutter underneath the soil face that can collect any excess glue (Fig. 2c). A piece of PVC pipe (diameter 10–15 cm) sliced in two and then capped on both ends can function as a good gutter, although a plastic bag may also do if positioned well. If the firmness of the soil profile allows, cut a 5 cm overhang below its bottom and locate the gutter underneath this overhang.
The total time required for field preparation strongly varies with the degree of care taken when preparing the soil face – a general time estimate for this step is ∼2 h for soils with a good rooting pattern. In sediments with no roots this step can be done in 5–10 min.
2.4 Impregnation: securing the sand grains with glue
2.4.1 Apply the glue
To allow for rapid application of the glue, open all the cans of glue and place them within reach of the soil face – or close to a helping hand who can give the cans to the person applying the glue. In contrast to the previously discussed older methods that required on-site mixing of glues or lacquers with thinning chemicals, glues used here are ready-for-use and can thus be used straight out of the can. Application of the glue on the soil face is easiest when using wide-mouth cans (∼15 cm diameter); we recommend using an empty vegetable can for pouring if the glue container has a narrower opening. Gently pour the glue by starting at the top ledge and moving the can across the width of the profile in a zig-zag pattern (Fig. 2d). While the glue moves downwards, also move down the location where the glue is applied. Most likely, a finger-like pattern will appear in the glue (Fig. 2d, Video S1 in the Supplement), especially when the soil face is rather vertical. This preferential flow is caused by the fact that liquids have a strong tendency to follow existing zones of (even slightly) higher liquid content (Liu et al., 1994), because of the large differences in hydraulic conductivity and thus flow velocity in dry and wet materials. Fill in the gaps between the preferential flow paths by pouring glue at their top and continue this process until the glue has reached the bottom of the soil face. When the bottom of the profile is reached, the impregnation stage is finished. We recommend application of only a single layer of glue: we qualitatively tested the effect of adding additional layers of glue, which did not improve the final product. In one case, application of a second layer of glue even resulted in movement of the initial layer, creating a glue-less patch and thus a hole in the final peel.
2.4.2 Clean up
With the glue application done, the impregnation step of making the lacquer peel is finished. The neoprene rubber contact adhesive is so strong and yet flexible within the first days of application that it can easily hold the weight of a soil profile without tearing. As such, reinforcement of the peel with cheesecloth as directed by Bouma (1969) is not required. Collect any excess glue that is still liquid from the top ledge and the bottom gutter. Remove all trash and leave the site such that any visitors (people or animals) cannot harm themselves. Cover the impregnated soil face with a large (fisherman's) umbrella if there is a chance of light rain, and wait 20–24 h to let the glue dry (Fig. 2e). The exact drying time will depend on meteorological conditions (air temperature, relative humidity, and wind) and exposure of the profile. It may be that the profile is dry and ready for extraction after less than 20–24 h. Testing of potentially reduced drying times in different conditions is advisable in cases where time is tight and weather conditions are advantageous.
2.5 Extracting the peel
2.5.1 Clear sides
Extraction of the peel from the soil face involves the repositioning of a lot of loose sand from behind the peel to the sides. To facilitate this sand removal, make sure that the soil face on either side of the impregnated section is flush with the lacquer peel for a width of ∼15 cm on either side. It is also advisable to remove sand around the bottom of the profile.
2.5.2 Cut out peel from above
Everything is now in place to start digging out the peel from above using the serrated edge of a (soil) knife. Starting at the top ledge, use the (soil) knife like a saw to make a cut 5–10 cm behind the glued soil face across the entire length of the peel (Fig. 2f, Video S1). The knife cuts fine roots; use garden clippers to cut off larger roots ∼5–10 cm away from the glue. The further out from the glue you make these cuts, the longer the roots will be that stick out of the finished peel, which can always be trimmed in Step 5 (Sect. 2.6).
Extraction of the soil peel is best done with two people, and can be done from the top (as outlined here) or from below (as outlined by Bouma, 1969). To extract the peel from the top, one person cuts away the soil and moves loose sand away from behind the profile and works their way down the profile. Once the top of the lacquer peel has been freed, a second person then presses a wooden board against the soil face that supports the top of the profile against the board (Fig. 2f, Video S1). This is to support the peel and prevent any tearing along fragile layers such as podzol fibres or thin loam bands. If the peel is heavy, for instance in the case of very structured soil, it can be partly folded over the top of the wooden board. Covering the edge of the wooden board with a thick towel can then reduce the risk of tearing that can occur in fragile layers.
Digging out the lacquer peel can be easy and straightforward if the peel is small and does not contain roots or concretions. Very small profiles (e.g. 40 by 40 cm) can even be done by a single person. Extracting a more typically sized peel (e.g. 30 cm wide by 120 cm long) is not necessarily difficult, but it can be arduous if layers are densely rooted or structured. Still, 15 to 30 min is usually sufficient to remove peels from a soil face.
2.6 Mounting the peel
2.6.1 Choose your mounting location
The extracted soil peel can be mounted on a wooden board either directly in the field or after transporting the peel to a laboratory, shed, carport, or garage. Mounting the peel in the field allows for safer transport, yet it does typically mean that the size of the wooden board and thus the final size of the lacquer peel is predetermined – unless there is a possibility of bringing power tools to the field to trim a board to size. Using a fixed board size is not a problem when making soil peels for teaching or outreach collection, but when using peels for soil art it can be worthwhile to determine the final peel size after extraction. After all, since the peel is a mirror image of the soil face (as discussed in Step 2), its final appearance remains a surprise until it is extracted from its location.
2.6.2 Test positioning
When ready to mount the peel, test its position on the wooden board to decide which features to keep. Measuring how much the peel will extend beyond the sides of the wooden board helps exact positioning once the board is glued. If the peel is too heavy to lift, reduce its weight by removing large aggregates by hand and/or by very carefully removing any large clumps of soil with a soft brush. A brush may also be used to remove loose sand (always stroke sand away in the direction of any soil layering), but only if the glue is fully dry.
2.6.3 Glue the wooden board
Cover the wooden board with some of the remaining glue (Fig. 2g), making sure to particularly cover its sides and corners as these are the most vulnerable parts of the finished peel. Use of a notched trowel facilitates an even spread of the glue, while corners and sides can be reached by hand using household gloves. Work swiftly as the glue dries quickly, particularly when the weather is warm (>25 ∘C) and windy.
2.6.4 Attach peel to board
Lift the lacquer peel up with two people and place it on the wooden board directly in the desired location: as the glue will create an instant grip, changing the alignment of the lacquer peel will be very challenging if not impossible.
2.6.5 Press peel in place
Carefully but firmly press the lacquer peel to the wooden board with your fingers. Again pay particular attention to the sides and corners of the wooden board to secure these well.
2.6.6 Remove loose sand
Turn the peel on its side and release any loose sand still resting on the peel by manually knocking the back of the wooden panel. Repeat until no sand falls off anymore. Keep some excess material from each layer (soil, any rock fragments, large roots) to restore any damaged patches later if needed.
2.6.7 Trim peel to size
Now that the peel has been secured to the wooden panel, trim it using a sharp (Stanley) knife (Fig. 2g). With one side of the knife touching the side of the wood, cut off all parts of the soil peel that extend beyond the wooden board. Retain strips to make mini-profiles or to test the effects of impregnation with a fixing agent (Sect. 2.7).
2.6.8 Restore any damaged patches and trim roots (if desired)
In some cases peels may have small holes or damaged patches if glue distribution was not uniform or where rock fragments or larger roots have fallen off. These patches can be easily restored by applying some glue and covering them with the appropriate material for that layer, such as soil particles, a rock fragment, or a large root. This is also the moment where roots can be trimmed if desired using shears or nail clippers. There is no predetermined root length: the final root length is very much part of the artistic freedom and the message that is communicated with the soil peel, if any.
2.7 Finishing, installation, and maintenance
2.7.1 Ventilate
The soil peel now requires some rest in a well-ventilated place to let the glue fully solidify – we ventilate our profiles for a minimum of 4 days. As glue fumes can be rather intense, a garage, shed, or covered dry outdoor location is best for this. Make sure to place the lacquer peel in a horizontal position – placing it vertically shortly after mounting may result in vertical movement of the drying glue and thus distortion of the soil profile.
2.7.2 Finish
Many authors suggest impregnating the undisturbed front of lacquer peels (e.g. Huisman, 1980; TNO, 2010) to intensify the colours of the soil particles and secure any loose particles. Our team did that from 1978 to 2010 using a large can of the cheapest hairspray sold at the local pharmacist, applying it 1 week after the soil peels were mounted. The hairspray did bring out the colours more, but once surprisingly produced such dark colours that any colour variation in the peel was obscured. It may be that the formula of the hairspray had changed, but the exact reason for this dramatic colour change was unknown. Since then, we have not sprayed peels anymore and are very satisfied with the original colours. As such, there was no need to find an alternative impregnation material. In the case that colours are weak, spraying with hairspray can be a way to intensify colours, but we strongly recommend testing of results along the entire length of the lacquer peel using the trimmed-off edges of the peel. In that case, turn the profile on its side to knock off any loose particles before spraying and ventilate again for a few days before installation.
2.7.3 Install
After a week of rest when the glue will be firm and odourless, the finished lacquer peel can be installed in its final location. Hooks screwed into the top of the board allow it to be hung vertically on a wall in a classroom, office, living room, museum, or wherever this piece of science art is desired. If desired, slats can be used to construct a wooden frame around the finished lacquer peel.
2.7.4 Maintenance
We have heard reports of people annually impregnating their soil peel with spray to “maintain its colours”. We have never seen a need for this and do not perform any maintenance of the finished peels. After changing from lacquer to glue, preservation of our peels has improved such that even intensive use in hands-on teaching does not degrade the peels anymore. If required, dust can be carefully removed from between any roots using a vacuum cleaner set at its lowest speed.
High participation in the maker-ed and DIY movements (Holtzman et al., 2007; Atkinson, 2006) indicates renewed interest in making things at home, while the potential of visualization is being recognized in science communication and education (Evagorou et al., 2015; Venhuizen et al., 2019). At the same time, there is increased interest in the value of soils for life (Keesstra et al., 2016; FAO, 2015). The creation of soil and sediment peels combines all these aspects, and can be done by non-specialists. Materials including glues are readily available at hardware stores, and even novices can create beautiful peels. Here we discussed the benefits of using peels and the challenges posed by the old methods (e.g. Voigt and Gittins, 1977; Van Baren and Bomer, 1979; Bouma, 1969) used to create these peels. We described the main steps of making a soil peel: impregnation of a smooth soil face with glue in the field before extracting the peel and then mounting it on a wooden panel. Because of a technological advance in the impregnation material (going from lacquers to glue), the method reported here is safer, simpler, more successful, more durable, and more accessible because (1) the glue can be used without the use and mixing of toxic chemicals in the field, (2) the firmness of the resulting peel is such that additional support materials (such as cheesecloth) are not required, and (3) consequently the soil peel will last for a long time, even when intensively used in hands-on teaching. While this method can be applied to a range of moisture contents and sand textures, further research on the best environmental conditions is required for those interested in achieving perfection in terms of appearance. Similar exploration is advised for alternative glues. Such additional research would be valuable for some (e.g. soil museums), but based on our experience, we believe that those simply interested in capturing a beautiful snapshot of soils can do so with the more qualitative guidance described in this paper. We hope that this thoroughly tested successful and simple method will inspire and enthuse researchers, educators, and the general public to make soil lacquer peels and thereby bring the value and beauty of soils to a wider audience.
Data used in this article can be found in Sect. 2, Table 2 and Video S1.
Video S1 can be downloaded free of charge from the TIB-AV portal (https://doi.org/10.5446/40805, Stoof et al., 2019).
Instruction video showing how to make a soil peel in the field. The supplement related to this article is available online at: https://doi.org/10.5194/soil-5-159-2019-supplement.
CRS conceptualized the main ideas, with input from JHJC and GP. GP developed the methodology, with input from CRS and JHJC. Visualizations were made by LAGMvdW, who coordinated the video with help from JHJC and CRS. CRS wrote the manuscript with contributions from all co-authors.
The authors declare that they have no conflict of interest.
Any use of trade, firm, or product names is for descriptive purposes only and does not imply endorsement by Wageningen University and Research.
Cathelijne R. Stoof, Jasper H. J. Candel, and Laszlo A. G. M. van der Wal dedicate this paper to educator Gert Peek (now retired), whose enthusiasm for soil science teaching and outreach has inspired thousands of students and staff. We thank Stephan Mantel (ISRIC-World Soil Information) for sharing information about the numerous institutes around the world that ISRIC has supported to make soil monolith collections, which greatly contributed to creating the global overview of locations with preserved soil profiles listed in Table 1. For any additions to this table, please contact ISRIC, who will be keeping updates. We would additionally like to thank two anonymous reviewers for their constructive comments, and a large number of others for their help in sourcing the data in Table 1: Albert Bos, Alberto Orgiazzi, Alejandro Becerra, Alessandro Samuel Rosa, Bernd Andeweg, Bram te Brake, Christine Morgan, Coen Ritsema, Colby Moorberg, Darya van Tienhoven, Erin Bush, Franciska de Vries, Hayley Craig, Ichsani Wheeler, Jacqueline Aitkenhead-Peterson, Jacqueline Hannam, Jakob Wallinga, Jantiene Baartman, Jerry Maroulis, Jetse Stoorvogel, Karen Vancampenhout, Keiko Mori, Kim Cohen, Kirsten van der Ploeg, Liam Heffernan, Marcos Angelini, Maurica Fitzgibbons, Meredith Steele, Michael Strickland, Mickey Ransom, Mirzokhid Mirshadiev, NSSC-GRU, Nynke Schulp, Piotr Pacanowski, Rachel Creamer, Richard Bardgett, Richard Kraaijvanger, Royal Eijkelkamp, Steffen Schweizer, Sytze van Heteren, Wieske Wentink, Wouter Thijs, Wouter van Gorp, and Zhanguo Bai. We thank Niels Kijm for assistance with making the lacquer peel for the video instructions, Bob Czaja and Ann Youberg for discussion of the types of glue that are internationally available, and Bison International for information on the characteristics of BisonKit. Cathelijne R. Stoof has received funding from the European Union's Horizon 2020 research and innovation programme under Marie Skłodowska-Curie grant agreement no. 706428.
This paper was edited by John Quinton and reviewed by two anonymous referees.
Allaire, S. A. and Bochove, E. V.: Collecting large soil monoliths, Can. J. Soil Sci., 86, 885–896, 2006.
American Museum of Natural History: Soils and Soil Conservation, available at: https://www.amnh.org/exhibitions/permanent-exhibitions/biodiversity-and-environmental-halls/felix-m.-warburg-hall-of-new-york-state-environment/soils-and-soil-conservation (last access: 20 May 2019), 2018.
AMI: Museum Tanah, available at: http://asosiasimuseumindonesia.org/anggota/74-museum-tanah.html (last access: 20 May 2019), 2018.
Arnoldussen, S. and van Os, B. J. H.: The potential of lacquer-peel soil profiles for palaeo-geochemical analysis using XRF analysis, CATENA, 128, 16–30, https://doi.org/10.1016/j.catena.2015.01.011, 2015.
Atkinson, P.: Do it yourself: democracy and design, J. Des. Hist., 19, 1–10, 2006.
Barahona, E. and Iriarte, A.: A method for the collection of soil monoliths from stony and gravelly soils, Geoderma, 87, 305–310, https://doi.org/10.1016/S0016-7061(98)00046-9, 1999.
Batjes, N. H.: ISRIC-WISE derived soil properties on a 5 by 5 arc-minutes global grid (ver. 1.2), ISRIC-World Soil Information, Wageningen, the Netherlands, 2012.
Bijkerk, J., Veen, J. T., Postma, G., Mikeš, D., Strien, W. V., and Vries, J. D.: The role of climate variation in delta architecture: lessons from analogue modelling, Basin Res., 26, 351–368, 2014.
BIS Nederland: Bodemdata, available at: http://maps.bodemdata.nl, last access: 31 January 2018.
Bison International: Bison Kit. Super sterke, vloeibare, universele contactlijm. 6305944 – Bison Kit® Blister 50 ml NL/FR, available at: https://www.bison.nl/content/dam/boltonadhesives/products/import/48/nl/2277/50.pdf, last access: 22 March 2018a.
Bison International: Bison Kit. Aromaatvrije, universele, vloeibabare contactlijm. 1301143 – Bison Professional Bison Kit® Blik 750 ml NL, available at: http://www.bisonprof.nl/static/products/assets/asset_2862_2.pdf, last access: 22 March 2018b.
Bouma, A. H.: Methods for the study of sedimentary structures, Wiley Interscience, New York, NY, USA, 1969.
Bouma, J. and Montanarella, L.: Facing policy challenges with inter- and transdisciplinary soil research focused on the UN Sustainable Development Goals, SOIL, 2, 135–145, https://doi.org/10.5194/soil-2-135-2016, 2016.
Breaker, J.: The Current Disturbed, in: Geoscientist, The Geological Society, London, UK, 2013.
Brevik, E. C., Cerdà, A., Mataix-Solera, J., Pereg, L., Quinton, J. N., Six, J., and Van Oost, K.: The interdisciplinary nature of SOIL, SOIL, 1, 117–129, https://doi.org/10.5194/soil-1-117-2015, 2015.
Brown, L. N.: The lacquer cement method of making soil monoliths, University of California, Division of Agricultural Sciences, 1963.
Chen, Z.-S.: Soil Museum in National Taiwan University, Taiwan, available at: http://lab.ac.ntu.edu.tw/soilsc/museum/assets_doc/Soil_Museum_in_NTU_Taiwan.pdf, last access: 20 May 2019.
Churchman, G. J. and Landa, E. R.: The soil underfoot: Infinite possibilities for a finite resource, CRC Press, Boca Raton, London, New York, 2014.
Day, J. H.: Making soil monoliths, Canada Department of Agriculture, 15 pp., 1968.
De Bakker, H. and Schelling, J.: Systeem van bodemclassificatie voor Nederland. De hogere niveaus, Grondboor & Hamer, 20, 229–229, 1966.
De Hoge Veluwe: Museonder, available at: https://www.hogeveluwe.nl/nl/bezoek-het-park/museonder (last access: 20 May 2019), 2018.
Dominati, E., Patterson, M., and Mackay, A.: A framework for classifying and quantifying the natural capital and ecosystem services of soils, Ecol. Econ., 69, 1858–1868, https://doi.org/10.1016/j.ecolecon.2010.05.002, 2010.
Donaldson, N. C. and Beck, D. J.: How to prepare a range soil monolith, J. Range Manage., 26, 460–462, 1973.
EEA: Copernicus Land Monitoring Service – EU-DEM, available at: https://www.eea.europa.eu/ds_resolveuid/DAT-193-en, last access: 22 June 2018.
Eesti Maaülikol: Estonian Soil Museum, available at: https://kogud.emu.ee/mullamuuseum/?lang=eng (last access: 20 May 2019), 2018.
Emirates Soil Museum: available at: http://www.emiratessoilmuseum.org/ (last access: 20 May 2019), 2018.
ETWIE: Collectie Bodemprofielen en Bodemkaarten KU Leuven, available at: https://www.etwie.be/database/actor/collectie-bodemprofielen-en-bodemkaarten-ku-leuven (last access: 20 May 2019), 2018.
Evagorou, M., Erduran, S., and Mäntylä, T.: The role of visual representations in scientific practices: from conceptual understanding and knowledge generation to “seeing” how science works, International Journal of STEM Education, 2, 11, https://doi.org/10.1186/s40594-015-0024-x, 2015.
Fan, Y., Li, H., and Miguez-Macho, G.: Global patterns of groundwater table depth, Science, 339, 940–943, 2013.
FAO: 2015 International Year of Soils, available at: http://www.fao.org/soils-2015/about/key-messages/en/ (last access: 22 March 2018), 2015.
Feigl, C.: Academic Showcases: the Collections at the University of Vienna, Böhlau Verlag, Wien, 2016.
Feller, C., Landa, E. R., Toland, A., and Wessolek, G.: Case studies of soil in art, SOIL, 1, 543–559, https://doi.org/10.5194/soil-1-543-2015, 2015.
Fitzpatrick, S. D., Schroeder, P. A., and Endale, D. M.: Creating deep soil core monoliths: Beyond the solum, Southeastern Geology, 51, 85–96, 2015.
Fosberg, M.: Collection and preparation of soil monoliths, https://pdfs.semanticscholar.org/presentation/c7e7/64393de686ea509c5a99d9100d0f41fcdd75.pdf, last access: 20 May 2019.
Fundacion ILAM: Museo de Suelos, available at: http://www.ilam.org/index.php/es/museo?id=4952 (last access: 20 May 2019), 2018.
Geologisch Streekmuseum “de IJsselvallei”: De collectie: available at: http://www.museumijsselvallei.nl/IJSSELVALLEI/mainframes.html (last access: 20 May 2019), 2018.
GIWSR: Guangdong Institute of World Soil Resources, China Soil Museum, available at: http://www.giwsr.com/en/cate/index/45 (last access: 20 May 2019), 2018.
Haddad, N., Lawrie, R., and Eldridge, S.: Improved method of making soil monoliths using an acrylic bonding agent and proline auger, Geoderma, 151, 395–400, 2009.
Hähnel, W.: Die Lackfilmmethode zur Konservierung geologischer Objekte, Präparator, 7, 243–264, 1961.
Hähnel, W.: The Lacquer-Film Method of Conserving Geological Objects, Curator: The Museum Journal, 5, 353–368, https://doi.org/10.1111/j.2151-6952.1962.tb01320.x, 1962.
Holtzman, B., Hughes, C., and Van Meter, K.: “Do it yourself” and the movement beyond capitalism, Constituent imagination: Militant Investigation, Collective theorization, AK Press Oakland, Edinburgh, West Virginia, ISBN 978-1-904859-35-2, Library of Congress Number: 2006924199, 44–61, 2007.
Huisman, H.: Het maken van Lakprofielen, Grondboor & Hamer, 34, 65–67, 1980.
IGAC: Instituto Geográfico Agustín Codazzi, Museo De Suelos, available at: https://www.igac.gov.co/es/contenido/areas-estrategicas/agrologia/museo-de-suelos (last access: 20 May 2019), 2018.
ISRIC: SoilGrids, available at: http://soilgrids.org, last access: 31 January 2018a.
ISRIC: World Soil Museum: available at: http://wsm.isric.org/ (last access: 20 May 2019), 2018b.
ISSCAS: Institute of Soil Science, Chinese Academy of Sciences. The modern soil monolith exhibition center, available at: http://english.issas.cas.cn/rs/sr/200908/t20090824_33728.html (last access: 20 May 2019), 2018.
IUSS: International Decade of Soils (2015–2024): available at: https://iuss.boku.ac.at/files/ids_general_intro_for_egu_and_web_v3.pdf (last access: 20 May 2019), 2015.
Jahn, R.: 75 years of Halle resin-film method for the extraction and preparation of soil films, J. Plant Nutr. Soil Sc., 169, 462–463, https://doi.org/10.1002/jpln.200521953, 2006.
Keesstra, S. D., Bouma, J., Wallinga, J., Tittonell, P., Smith, P., Cerdà, A., Montanarella, L., Quinton, J. N., Pachepsky, Y., van der Putten, W. H., Bardgett, R. D., Moolenaar, S., Mol, G., Jansen, B., and Fresco, L. O.: The significance of soils and soil science towards realization of the United Nations Sustainable Development Goals, SOIL, 2, 111–128, https://doi.org/10.5194/soil-2-111-2016, 2016.
Kerala Forest Research Institute: Soil museum, available at: http://www.kfri.res.in/soil_museum.asp (last access: 20 May 2019), 2018.
Kiniry, L. N. and Neitsch, C. L.: Monolith collection and preparation for soils without restrictive layers, USDA-NRCS, available at: https://www.nrcs.usda.gov/Internet/FSE_DOCUMENTS/nrcs144p2_002455.pdf, last access: 20 May 2019.
Krzic, M., Strivelli, R. A., Holmes, E., Grand, S., Dyanatkar, S., Lavkulich, L. M., and Crowley, C.: Virtual Soil Monoliths: Blending Traditional and Web-Based Educational Approaches, Journal of Natural Resources & Life Sciences Education, 42, 1–8, https://doi.org/10.4195/nse.2012.0014, 2013.
Lawrie, R. and Enman, B.: Using monoliths to communicate soil information, Proceedings of the 19th World Congress of Soil Science: Soil solutions for a changing world, Brisbane, Australia, 1–6, 2010.
Liu, Y., Steenhuis, T. S., and Parlange, J.-Y.: Formation and persistence of fingered flow fields in coarse grained soils under different moisture contents, J. Hydrol., 159, 187–195, 1994.
Lladós, A., Adell, J., Rivas, G., and Berastegui, X.: Soil monoliths of the pyrenees. A long term project of the cartographic and geologic institute of catalonia, Institut Cartogràfic i Geològic de Catalunya, 2017.
Martinius, A. and Van den Berg, J.: Atlas of sedimentary structures in estuarine and tidally-influenced river deposits of the Rhine-Meuse-Scheldt system, EAGE, Houten, 2011.
Megonigal, J. P., Stauffer, B., Starrs, S., Pekarik, A., Drohan, P., and Havlin, J.: “Dig It!”: How an Exhibit Breathed Life into Soils Education, Soil Sci. Soc. Am. J., 74, 706–716, https://doi.org/10.2136/sssaj2009.0409, 2010.
Minasny, B., Malone, B. P., McBratney, A. B., Angers, D. A., Arrouays, D., Chambers, A., Chaplot, V., Chen, Z.-S., Cheng, K., Das, B. S., Field, D. J., Gimona, A., Hedley, C. B., Hong, S. Y., Mandal, B., Marchant, B. P., Martin, M., McConkey, B. G., Mulder, V. L., O'Rourke, S., Richer-de-Forges, A. C., Odeh, I., Padarian, J., Paustian, K., Pan, G., Poggio, L., Savin, I., Stolbovoy, V., Stockmann, U., Sulaeman, Y., Tsui, C.-C., Vågen, T.-G., van Wesemael, B., and Winowiecki, L.: Soil carbon 4 per mille, Geoderma, 292, 59–86, https://doi.org/10.1016/j.geoderma.2017.01.002, 2017.
Montanarella, L., Pennock, D. J., McKenzie, N., Badraoui, M., Chude, V., Baptista, I., Mamo, T., Yemefack, M., Singh Aulakh, M., Yagi, K., Young Hong, S., Vijarnsorn, P., Zhang, G.-L., Arrouays, D., Black, H., Krasilnikov, P., Sobocká, J., Alegre, J., Henriquez, C. R., de Lourdes Mendonça-Santos, M., Taboada, M., Espinosa-Victoria, D., AlShankiti, A., AlaviPanah, S. K., Elsheikh, E. A. E. M., Hempel, J., Camps Arbestain, M., Nachtergaele, F., and Vargas, R.: World's soils are under threat, SOIL, 2, 79–82, https://doi.org/10.5194/soil-2-79-2016, 2016.
Mueller, A.: The Science Education Resource Center at Carleton College, Making a Soil Monolith: available at: https://serc.carleton.edu/introgeo/field_lab/examples/soil_monolith.html (last access: 20 May 2019), 2018.
Muzeum Gleb: available at: http://www.les.ur.krakow.pl/kgl/ceg/ (last access: 20 May 2019), 2018.
Natural Resources Canada: Forest soils of Ontario – Soil monolith collection at GLFC, available at: https://cfs.nrcan.gc.ca/projects/101 (last access: 20 May 2019), 2018.
Nauta, A.: Het Centraal Kernhuis: luilekkerland voor geologen (The central core facility of the Geological Survey of the Netherlands: candy store for geologists), Geo. Brief, 34, 6–9, 2009 (in Dutch).
NRCS: Guide to texture by feel, available at: https://www.nrcs.usda.gov/wps/portal/nrcs/detail/soils/edu/?cid=nrcs142p2_054311, last access: 20 May 2019.
Ohu, J. O., Raghavan, G., and McKyes, E.: Peatmoss effect on the physical and hydraulic characteristics of compacted soils, T. ASAE, 28, 420–424, 1985.
PRI: Cayuga Nature Center – Layers of Life: available at: https://priweb.org/index.php/exhibitions/cnc-exhibits/layers-of-life (last access: 20 May 2019), 2018.
Rawls, W., Pachepsky, Y. A., Ritchie, J., Sobecki, T., and Bloodworth, H.: Effect of soil organic carbon on soil water retention, Geoderma, 116, 61–76, 2003.
Rawls, W. J., Brakensiek, D. L., and Saxtonn, K.: Estimation of soil water properties, T. ASAE, 25, 1316–1320, 1982.
Russian Museums: The Dokuchaev Central Soil Museum, available at: http://www.russianmuseums.info/M150 (last access: 20 May 2019), 2018.
Schindelbeck, R. R., van Es, H. M., Abawi, G. S., Wolfe, D. W., Whitlow, T. L., Gugino, B. K., Idowu, O. J., and Moebius-Clune, B. N.: Comprehensive assessment of soil quality for landscape and urban management, Landscape Urban Plan., 88, 73–80, https://doi.org/10.1016/j.landurbplan.2008.08.006, 2008.
Schulze, D. G., Nagel, J. L., Van Scoyoc, G. E., Henderson, T. L., Baumgardner, M. F., and Stott, D. E.: Significance of Organic Matter in Determining Soil Colors, in: Soil Color, edited by: Bigham, J. M. and Ciolkosz, E. J., SSSA Special Publication, Soil Science Society of America, Madison, WI, 71–90, 1993.
Schuurman, J.: Een nieuwe methode voor het gezamenlijk conserveren van profielen en bijbehorende wortelstelsels, Landbouwk. Tijdschr, 67, 389–394, 1955.
Singhal, B. B. S. and Gupta, R. P.: Applied hydrogeology of fractured rocks, Springer Science & Business Media, the Netherlands, 1999.
Soil Science Division Staff: Soil Survey Manual, Soil Science Division Staff, edited by: Ditzler, C., Scheffe, K., and Monger, H. C., Government Printing Office, Washington, D.C., USA, 2017.
Stoof, C. R., Candel, J. H. J., van der Wal, L. A. G. M., and Peek, G.: Soil lacquer peel DIY: simply capturing beauty, https://doi.org/10.5446/40805, 2019.
Stoorvogel, J. J., Bakkenes, M., Temme, A. J., Batjes, N. H., and Brink, B. J.: S-World: A Global Soil Map for Environmental Modelling, Land Degrad. Dev., 28, 22–33, 2017.
Stott, D. E. and Moebius-Clune, B. N.: Soil Health: Challenges and Opportunities, in: Global Soil Security, Springer International Publishing, Cham, 109–121, 2017.
Thai Museums Database: Soil Museum Bangkok, available at: http://www.sac.or.th/databases/museumdatabase/en/review_inside.php?id=197 (last access: 20 May 2019), 2018.
Thien, S. J.: A flow diagram for teaching texture-by-feel analysis, Journal of Agronomic Education, 8, 54–55, 1979.
TNO: Een lakprofiel als geschiedenisboek en kunstobject, Geologie van Nederland, the Netherlands, 2010.
UFLA: Exposição sobre os solos de Minas no Museu Bi Moreira permanece até final de abril, available at: http://www.ufla.br/ascom/2016/04/04/exposicao-sobre-os-solos-de-minas-no-museu-bi-moreira-permanece-ate-final-de-abril/ (last access: 20 May 2019), 2016.
UFRR: Museu de Solos de Roraima, available at: http://ufrr.br/museusolos/index.php?option=com_content&view=category&layout=blog&id=18&Itemid=272 (last access: 20 May 2019), 2018.
UFSM: Museu de Solos do Rio Grande do Sul, available at: http://w3.ufsm.br/msrs/ (last access: 20 May 2019), 2018.
UGR: Universidad de Granada, Museo de Suelos, available at: http://www.ugr.es/~edafolo/museo_ciencias.php (last access: 20 May 2019), 2018.
UM: Universidad de Murcia, Museo de Suelos: available at: http://www.um.es/web/museodesuelos/contenido/museo (last access: 20 May 2019), 2018.
UNAL: Universidade Nacional de Colombia – Sede Palmira, Recursos de la Sede – Museo de Suelos Ciro Molina Garcés, available at: http://www.palmira.unal.edu.co/index.php/lasede/recursos (last access: 20 May 2019), 2018.
Univeristy of Idaho: Maynard A. Fosberg Soil Monolith Collection, available at: https://libguides.uidaho.edu/soil (last access: 20 May 2019), 2018.
University of Nebraska – Lincoln: How is a soil monolith made?: available at: https://youtu.be/GXblHE3uznQ (last access: 31 January 2018), 2016.
Van Baren, J. and Bomer, W.: Procedures for the collection and preservation of soil profiles, International Soil Museum, Wageningen, the Netherlands, 1979.
Van Baren, J. and Sombroek, W.: The case for soil reference collections, Reviews and Articles: ISM Annual Report, Wageningen, the Netherlands, available at: http://library.wur.nl/isric/fulltext/isricu_i29399_001.pdf (last access: 20 May 2019), 1981.
Van den Berg, J., Boersma, J., and Gelder, A. V.: Diagnostic sedimentary structures of the fluvial-tidal transition zone – Evidence from deposits of the Rhine and Meuse, Neth. J. Geosci., 86, 287–306, 2007.
van der Beek, J. and Ellenkamp, G. R.: Geologie, bodem en landschap van het centrale zandlandschap, Laboratorium voor Bodemkunde en Geologie, Wageningen University, Wageningen, the Netherlands, 137 pp., 2003.
van der Haar, J., Faber, J. A., and de Ruiter, M.: De geschiedenis van de Landbouwuniversiteit Wageningen, Landbouwuniversiteit, Wageningen, 1993.
Van Heerd, R. and Van't Zand, R.: Productspecificatie Actueel Hoogtebestand Nederland, Rijkswaterstaat Meetkundige Dienst, Delft, 1999.
Van Veen, J.: Lakprofielen maken: geen kunst, maar decoratieve documentatie, GEA, 18, 156–160, 1985.
Venhuizen, G. J., Hut, R., Albers, C., Stoof, C. R., and Smeets, I.: Flooded by jargon: how the interpretation of water-related terms differs between hydrology experts and the general audience, Hydrol. Earth Syst. Sci., 23, 393–403, https://doi.org/10.5194/hess-23-393-2019, 2019.
Voigt, E.: Die lackfilmmethode, ihre Bedeutung und Anwendung in der Paläontologie, Sedimentpetrographie und Bodenkunde, Zeitschrift der Deutschen Geologischen Gesellschaft, 88, 272–292, 1936.
Voigt, E. and Gittins, G.: The “Lackfilm” Method for Collecting Sedimentary Peels: Archaeological Applications, J. Field Archaeol., 4, 449–457, https://doi.org/10.2307/529401, 1977.
Vos, P., Kaskes, P., Booltink, W., and Harting, R.: Het nieuwe lakken, Geo. Brief KNGMG, 6, 4–5, 2016.
Wessel, B. M., Fiola, J. C., and Rabenhorst, M. C.: Soil morphology, genesis, and monolith construction of an acid sulfate soil with silica-cementation in the US Mid-Atlantic Region, Geoderma, 308, 260–269, 2017.
Wills, S. A., Burras, C. L., and Sandor, J. A.: Prediction of Soil Organic Carbon Content Using Field and Laboratory Measurements of Soil Color, Soil Sci. Soc. Am. J., 71, 380–388, https://doi.org/10.2136/sssaj2005.0384, 2007.
Wösten, J., Lilly, A., Nemes, A., and Le Bas, C.: Development and use of a database of hydraulic properties of European soils, Geoderma, 90, 169–185, 1999.
Wright, M.: The preparation of soil monoliths for the ninth International Congress of Soil Science, Adelaide, 1968, Geoderma, 5, 151–159, 1971.
YGK: Tuproqshunoslik va agrokimyo ilmiy-tadqiqot instituti (Soil Science and Agrochemistry Research Institute), available at: http://ygk.uz/uz/node/286 (last access: 20 May 2019), 2018.